10
11
Using The Top Menu
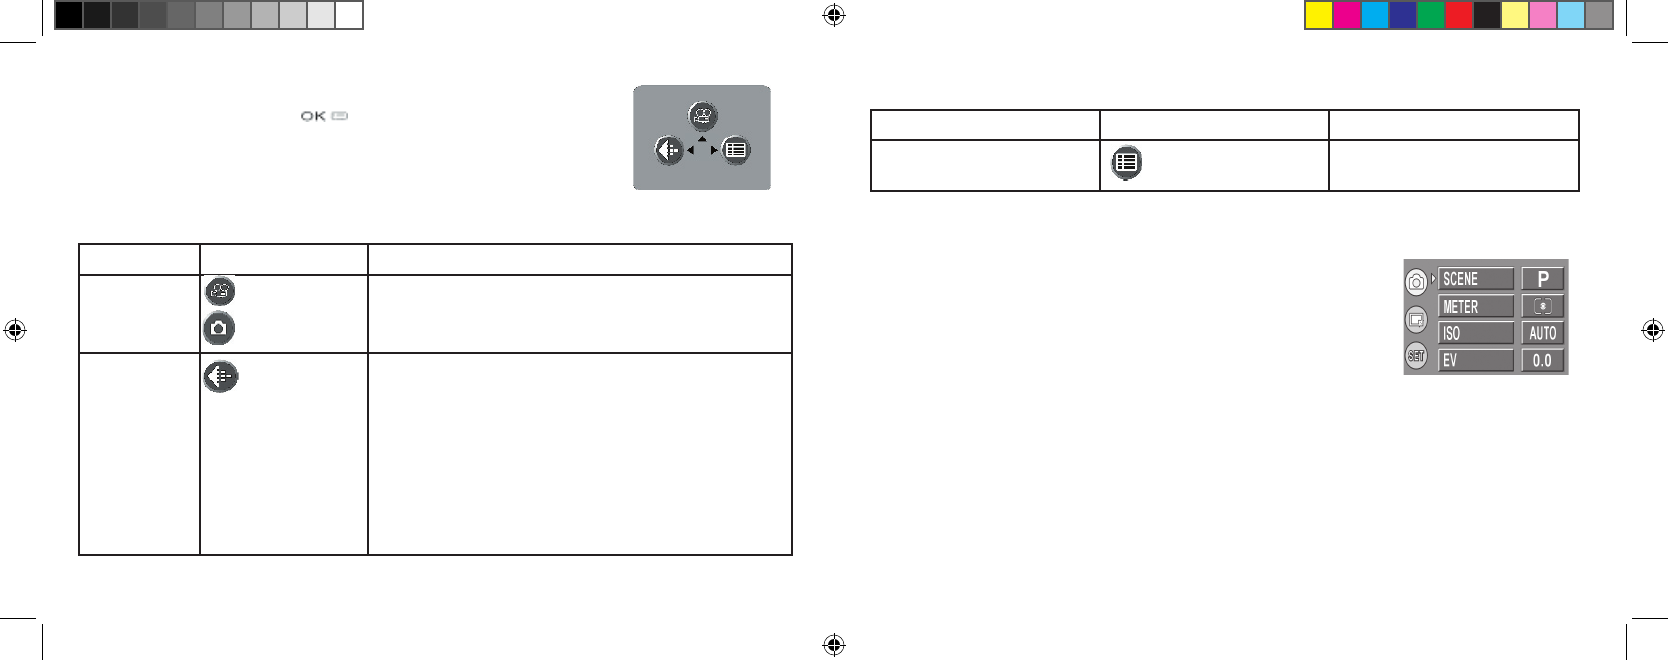
Pressing the OK/Menu button below the arrow pad will display the
top menu selections on the LCD. There are 2 “Shortcut” menus, which allow
you to quickly change the photo size/quality or switch to movie mode, and a
Mode menu containing multiple settings arranged in groups or “tabs”. Press
the keypad button in the same direction of the icon for each menu to enter it.
The menus and their functions are :
Menu Icon Action
Movie Mode/
Still Photo
Mode
from photo mode
from movie mode
Switches from still photo to movie mode for recording
video clips (avi format). Press the “up” arrow key again to
return from movie mode to still photos.
Image Size &
Quality
Image (file) Size can be set from 2048x1536 down to
800x600 pixels in 5 steps. Larger image sizes provide higher
resolution (sharpness) but use more storage memory. Image
Quality can be set to “FQ” (fine quality), “NQ” (normal
) or “EQ” (economy). This affects the amount of .jpg file
compression, with FQ being the least compression/highest
quality/largest file. The smaller size/lower quality settings
will use less memory , if you know you will only make small
prints or email your photos.
Menu Selection
Display
Menu Icon Action
Mode Menu Opens additional menus as
described next.
Using The Top Menu continued
Inside The Mode Menu-Additional Settings
Mode Menu screen,
showing (from left)
Group, Item, and Set-
ting columns. Use the
4-way keypad to move
around within them in
any direction.
After pressing the OK/Menu button to see the 3 top menus, use the right
keypad button to open the Mode Menu. Selections within the Mode
Menu are arranged in 3 groups, or tabs, as seen on the left column in the
Mode Menu screen. To select a menu group, use the up/down buttons.
Then press the right button to move to the second column, which shows
the items in that group. Again use the up/down button to go to the item
you want, then press the right key to move to the third column and see
the available settings for that item. Use the up/down buttons to select
the setting you want, then press the OK/Menu button to confirm. When
finished making your settings, continue to press the OK/Menu button
until you return to the normal display. The Mode Menu groups, and the
item/settings submenus within each, are arranged in the following order
(default settings are in
bold):
Note: only the first # is
shown in the size menu:
2048 x 1536
1600 x 1280
1280 x 960
1024 x 768
800 x 600
11-0013 1LIM.indd 10-11 9/22/04 4:33:40 PM


