


4
5
Congratulations on your purchase of the Bushnell
®
Digital Trail Sentry
™
Camera!
This weatherproof, rugged trail camera is designed to record still images or movie
clips of outdoor wildlife activity. This instruction manual will help you understand,
setup, and use your Sentry to achieve the best possible results.
Bushnell Digital Trail Sentry Features
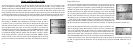
If you’ve been looking for a digital game scouting or surveillance camera that has all the essential
features but without the unwanted frills, expense, or confusing operational menus of some less
effective off-brand “game cams”, the Bushnell Trail Sentry will end your search. With one of the
most user friendly interfaces in the industry, this trail camera is easy to setup and use. The extra -
wide strap ensures a secure mount to the tree, and a padlock loophole plus software password keeps
out would-be thieves. The high resolution digital camera delivers crisp views of game in your area
and stamps each image with date & time. The Sentry can capture 1.3MP (software interpolated) still
images, or 15 second movie clips. All images, movies and events are recorded onto an SD card (not
included) for convenient transfer to your home computer (or use the Bushnell 11-9500C Trail Scout
Viewer to view, copy and delete images in the field). The camera will function day and night and
sense game out to 45 feet. The oversized incandescent flash will reach out to 15 feet for nighttime
images. A new photo is taken every 30 seconds for as long as motion/heat events are detected. The
LCD display makes set up a breeze in the field. The Trail Sentry is rugged and weatherproof.
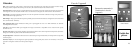
QUICK GUIDE: BUSHNELL TRAIL SENTRY 11-9000
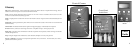
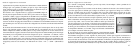
1. Open the camera by releasing the latches on the right side of the camera. Install 4 “D” cell batteries (flat base of all batteries
contacting springs), and insert an SD card (not included, use any capacity from 16MB to 1GB) in the slot to the right of the 5
buttons (upside down, brand name facing you). Press the card down until you hear it click into place.
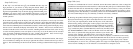
2. Press and release the Power switch. The display will show four “dashes”, then change to “HHHH” with a blinking key icon
below it. This is a prompt to enter your password, which can be changed in the setup menu. The first time the camera is turned
on, the password is the default, “0000”. Press the Enter button four times to enter four zeros, then press it again to confirm-the
display indicates “PASS” and the camera is ready to operate. If the wrong password is entered, the display will flash “ERRO”
and the camera will not work.
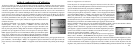
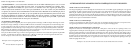
3. If you are using the camera for the first time, you should set the date and time so your photos will be “stamped” correctly.
Briefly press the Menu button-”DATE” will blink on the display. Press Enter to confirm you want to change the date, then the
first two digits will flash, prompting you to enter the month. Use the Up/Down buttons to set the current month, then press Enter,
and repeat to set the day of the month and press Enter again. The display will then change to let you set the year, with only the
last two digits flashing (“20_ _”). Again use the Up/Down buttons to change the year if necessary, press enter, and set the time
(“TIME” will flash, press enter and use Up/Down to set the hour and minute. The time display uses the 24 hr standard, so 2:00
PM is indicated as “1400”, etc).
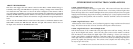
4. After the date and time have been set, and Enter is pressed, “EVENT” will blink on the display. Press Enter and the “camera”
icons for still photos and movie clips will both blink. This allows you to choose which type of file will be recorded every 30
seconds for as long as motion and heat events are detected. Press Enter again, and only the still photo icon will blink. Pressing
the UP and DOWN buttons will now let you alternate between blinking movie camera and still photo icons. Select the image file
mode you prefer and press ENTER while that icon is blinking.