


14
Turning On the Printer
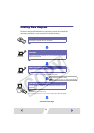
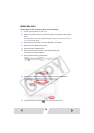
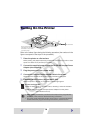
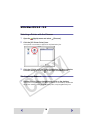
Refer to the above figure during the following procedure (the numbers in the
figure correspond to the steps in the procedure).
1
Place the printer on a flat surface.
When printing, the paper temporarily projects out from the rear, so allow a clear
space of at least 15 cm (6 inches) in the back.
2
Connect the supplied power cord to the CA-CP100 Compact Power
Adapter (also supplied).
3
Plug the power cord into a power outlet.
4
Connect the Compact Power Adapter cable to the printer.
At this point the CP-220 is ON, so the printer’s indicator lights green.
5
Press the ON/OFF button (only on the CP-330).
When the printer is turned on, the printer's indicator lights green.
To Turn the Printer Off
• With CP-330: Press the ON/OFF button, releasing it when the indicator
turns off.
• With CP-220: Unplug the Compact Power Adapter from the printer
(the indicator turns off).
• When making connections, confirm that the shape of the plug matches
the shape of the socket on the device being connected.
• The power outlet where the printer's power plug is connected should be
located where the plug can be easily removed if a problem occurs.
1
2
3
4
5
Compact
Power Adapter
To Power Outlet
At least 15 cm (6 inches) of
open space in the front and back,
and at least 10 cm (4 inches)
on the left and right.