


155
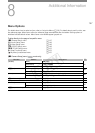
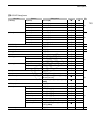
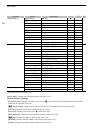
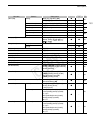
Menu Options
1
Not available in the [Photos] index screen.
2
The default value depends on the country/region or purchase.
3
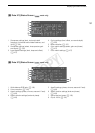
Setting options for [Assign Button]: [(NONE)], [Peaking], [Zebra], [WFM (LCD)], [Edge Monitor], [Magnification], [Color Bars],
[Markers], [LCD Setup], [VF Setup], [LCD/VF B&W], [Onscreen Display], [Add Shot Mark 1], [Add Shot Mark 2], [Add $ Mark],
[Add % Mark], [Time Code], [Time Code Hold], [Headphone +], [Headphone -], [Audio Output CH], [Audio Level], [Photo],
[FUNC.], [FUNC. Shutter], [FUNC. ISO/Gain], [FUNC. WB], [My Menu], [Initialize Media], [User Setting (NONE)].
The default settings are as follows. [1]: [Magnification], [2]: [Peaking], [3]: [Zebra], [4]: [WFM (LCD)], [5]: [Headphone +], [6]:
[Headphone -], [7]: [Magnification], [8]: [WFM (LCD)], [9]: [Edge Monitor], [10] to [15]: [(NONE)].
4
Available in the clip index screen only.
5
Available in the clip index screen and [$ Mark] index screen only.
6
Available in the [Photos] index screen only.
7
Only appears when the optional WFT-E6 Wireless File Transmitter is attached to the camcorder.
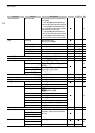
[Reset]: Reset various camcorder settings.
[All Settings]: Resets all the camcorder’s settings to default settings, except for the hour meter.
[Camera Settings]: Resets the white balance, iris (# only), ISO speed, gain, shutter speed, [~ Camera
Setup] settings and custom picture settings to default settings.
[Assignable Buttons]: Resets the assignable buttons to default settings.
[Tally Lamp]: Allows you to set whether the tally lamp illuminates while the camcorder is recording.
[Media Access LED]: Allows you to set whether the CF card access indicators or the SD card access indicator
illuminates while the camcorder is accessing a CF card or SD card.
[Genlock Adjust.]: The phase difference between the external Genlock signal and the camcorder is initially set to
0. This function allows you to adjust it within the range of approx. ±0.4 H (-1023 to 1023). When setting to 1000
or more or -1000 or less, set the first field to 10 or -10, respectively.
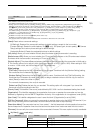
[Clips] settings
[Title Prefix]: Determines the first 2 characters of the clip name. Combined with the [Number Setting] setting,
this constitutes the 6-character clip name.
[Number Setting]: Determines the last 4 digits of the clip name. Combined with the [Title Prefix] setting, this
constitutes the 6-character clip name. Select [Set] to assign a desired number to the first clip you record or
select [Reset] to reset the number to [0001].
The numerals increase every time a clip is recorded.
[Delete Last Clip]: Deletes the last clip you recorded. This setting option will not appear if you turned the
camcorder off since recording the last clip.
[Country Code]: This identifier is the country code defined by ISO-3166-1 and is to be entered starting from the left.
[Organization]: This identifier represents the organization that owns or operates the camcorder and can be
obtained by registering with the SMPTE Registration Authority. If the organization is not registered, enter [0000].
[User Code]: This identifier designates the user. Leave this blank if [Organization] is set to [0000].
[SDI Rec Command]: When you connect the camcorder to another device using the HD/SD SDI terminal, if you
start or stop recording with the camcorder, the other device will also start or stop recording.
[Reset Hour Meter]: The camcorder has two “hour meters” – the first keeps track of total operation time and the
second keeps track of operation time since the last time the second hour meter was reset with this function.
[Firmware]: You can verify the current version of the camcorder’s firmware. This menu option is usually unavailable.
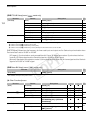
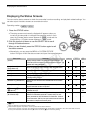
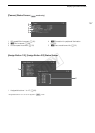
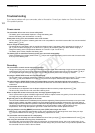
[ My Menu] ( mode only)
[Firmware] – Ü – –
Menu item Submenu Setting options A
[Edit] [Register] [Cancel], [OK] 30
[Move] [Cancel], [OK]
[Delete] [Cancel], [OK]
[Reset All] [Cancel], [OK]
Menu item Submenu Setting options A
COPY