


Clip Operations
118
Adding e Marks or Z Marks
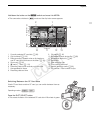
If you add an OK mark (e) or check mark (Z) to a clip, you can later display an index screen that shows only
the clips with an e mark or only the clips with a Z mark. Furthermore, you cannot delete clips with an e mark
so you can use it to protect important clips.
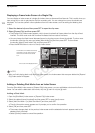
1 Select the desired clip and then press SET to open the clip menu.
2Select [Add e Mark] or [Add Z Mark] and then press SET.
• The clip information screen appears and it prompts you to confirm the operation.
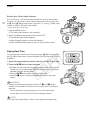
3 Select [OK] and then press SET.
• The screen changes back to the clip index screen and an e mark or Z appears next to the selected clip’s
thumbnail.
• Select [Cancel] instead to cancel the operation.
NOTES
• If you set an assignable button to [Add e Mark] or [Add Z Mark] (0 97), you can add an e mark or
Z mark from the index screen, during playback or during playback pause.
• A clip cannot have both an e mark and Z mark at the same time. When you add a Z mark to a clip with an
e mark, the e mark will be deleted. Similarly, when you add an e mark to a clip with a Z mark, the
Z mark will be deleted.
Deleting e Marks or Z Marks
Deleting an e Mark or Z Mark from a Clip
1 Select the desired clip and then press SET to open the clip menu.
2 Select [Delete e Mark] or [Delete Z Mark] and then press SET.
• The clip information screen appears and it prompts you to confirm the operation.
3 Select [OK] and then press SET.
• The screen changes back to the clip index screen the selected mark is deleted.
• Select [Cancel] instead to cancel the operation.
Deleting e Marks from All Clips
1 Open the [Delete All e Marks] submenu.
[J Other Functions] [Delete All e Marks]
2 Select [OK] and then press SET.
•All e marks from clips on the selected CF card will be deleted.
• Select [Cancel] instead to cancel the operation.
•While the e marks are being deleted, you can press SET to cancel.
3 When the confirmation message appears, press SET.
[J Other Functions]
[Delete All e Marks]
COPY