


21
Recording Images
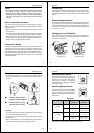
Caution
• Never open the battery compartment cover, disconnect the
AC adaptor from the camera or unplug it from the wall
socket while the “WAIT” message is on the LCD. Doing so
will not only make storage of the current image impossible, it
can also corrupt other image data already stored in camera
memory.
How to avoid hand movement…
Any hand movement when you press the shutter button can causes
blurring of the recorded image. Note the following points on avoiding
hand movement.
• Make sure there is no excessive movement of the image of the ob-
ject on the LCD.
• Use a tripod whenever possible when recording images in dim light-
ing. The camera automatically adjusts shutter speed in accordance
with the brightness of the object whose image is being recorded.
Shutter speed is quite slow for dimly lit objects, increasing the pos-
sibility of blurring caused by hand movement.
Fluorescent Lighting
Fluorescent lighting actually flickers at a frequency that cannot be
detected by the human eye. When using the camera indoors under
such lighting, you may experience some brightness or color problems
with recorded images. The actual extent of the problems depends on
what cycle of the fluorescent light’s flicker is occurring when the cam-
era’s shutter actually releases. For best results, use a commercially
available video lights.
Operation
22
Infrared Light
Infrared light generated by a flash or other source can create image
color problems, such as red areas being recorded as green. Such
color problems will show up in the LCD while you are composing the
image.
Shooting Images Outdoors
Strong direct or reflected sunlight can cause recorded images to take
on a greenish tinge. This is due to the characteristics of the camera’s
charge-coupled device (CCD), and it does not indicate malfunction of
the camera. One way you can try to minimize this problem is to set
the aperture to [ ] (F8).
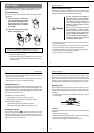
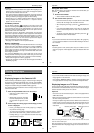
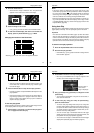
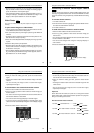
Changing the Lens Orientation
The lens of the camera is built into a lens body that is designed to
rotate. This means you can change the angle of the lens without mov-
ing the rest of the camera.
Rotates up to 90
°
towards the front
Rotates up to 180
°
towards the back
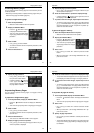
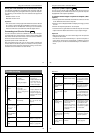
23
Recording Images
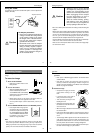
• Any images recorded while the lens body is rotated so the lens is
pointed from the back of the camera are stored as mirror images of
the image that appears in the LCD before the shutter button is
pressed.
AA
AA
A
BB
BB
B
Important!
• Do not apply excessive force when rotating the lens body. Doing so
can cause serious damage to the lens.
• Do not carry the camera or move it around while holding onto only
the lens body.
• Return the lens body to its normal position (with the lens pointing
from the front of the camera) before storing the camera.
AA
AA
A LCD when shutter button is
pressed (in the Record Mode)
BB
BB
B LCD when image is played
back from camera memory
.......
.......
Operation
24
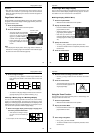
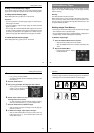
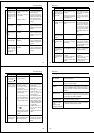
NORMAL/MACRO Switch
The NORMAL/MACRO switch tells the
camera how much distance there will be
between the lens and the object whose
image you are recording. The following
table describes the conditions covered by
each switch setting.
Switching Between Lenses
This camera gives you a choice between
telephoto (TELE) and wide-angle (WIDE)
lenses. The following shows the optimum
distances at which you should use each of
these lenses.
MACRO NORMAL
TELE
WIDE
Distances
* See page 27 for information on changing the aperture.
Lens Aperture Normal Macro
(NORMAL) (MACRO)
Wide Angle (WIDE)
F2.6( ) 0.6m ~ ∞ 9cm ~ 11cm
f = 4.9mm (2' ~ ∞) (3.5" ~ 4.3")
F8 ( ) 0.3m ~ ∞ 7cm ~ 14cm
(1' ~ ∞) (2.8" ~ 5.5")
Telephoto (TELE)
F2.6( ) 3.4m ~ ∞ 52cm ~ 62cm
f = 11.0mm (11.2' ~ ∞) (1.7' ~ 2')
F8 ( ) 1.7m ~ ∞ 44cm ~ 77cm
(5.6' ~ ∞) (1.4' ~ 2.5')