


4-7
ASA 5505 Getting Started Guide
78-18003-02
Chapter 4 Installing the ASA 5505
Optional Procedures
When you connect other devices to any of the inside ports, make sure that they do
not have the same IP address.
Note The MGMT interface of the adaptive security appliance is assigned
192.168.1.1 by default, so this address is unavailable.
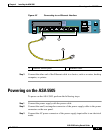
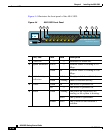
Step 3 Use an Ethernet cable to connect the PC to a switched inside port on the rear panel
of the ASA 5505 (one of the ports numbered 1 through 7).
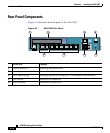
Step 4 Check the LINK LED to verify that the PC has basic connectivity to the ASA
5505.
When connectivity is established, the LINK LED on the front panel of the ASA
5505 lights up solid green.
You can now access the ASDM and the ASDM Startup Wizard. See Chapter 5,
“Configuring the Adaptive Security Appliance” for information about how to
perform initial setup and configuration of the ASA 5505.
Optional Procedures
This section describes how to perform tasks that are not required for the initial
setup of the ASA 5505. This section includes the following topics:
• “Connecting to the Console” section on page 4-7
• “Installing a Cable Lock” section on page 4-8
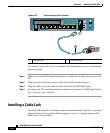
Connecting to the Console
You can access the command line for administration using the console port on the
ASA 5505. To do so, you must run a serial terminal emulator on a PC or
workstation as shown in Figure 4-3.