


Initial Set Up
1.
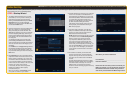
TheStartupWizardwilllaunchonceyourDVR
has booted up. You may choose to create your
password for the admin account at this time.
Clicking in the Password field will open a Virtual
Keyboard to allow you to enter characters.
Otherwise, you may set it later in the User menu
found inside the Basic menu.
2.Therearethreeareasinthisnextwindowwhich
allow you to select your preferred language
alongwithsettingthecorrectdatetime.The
Time tab also enables you to set your
preferred
format for displaying dates (day, month or year
rst)aswellaswhethertheDVRwillusethe24-
hourmethodortheconventionalAM/PMmode
for noting time.
You should also select your time zone at this
point. Enabling Time Server allows the DVR to
check a network server to maintain accurate time
which can be vital to ensure the integrity of your
recordings.
UsetheDST tab to set Daylight Savings Time so
that the DVR will adjust the clock automatically.
If you do not know when it begins or ends, you
may make these settings at a later time using the
Basic menu.
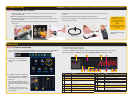
3. Click Next SteptotogettotheNetworkSetup
explanation window.You should ensure that your
DVR is properly connected to your router using
an Ethernet or Network cable before continuing.
It is not recommended to connect the DVR to a
network hub, but rather directly to the router that
connects your system to the Internet.
In most cases, the router will have a light that
flashes when it detects a device properly
connected to that port.
When you are ready, click Next Step to allow
your system to connect to your network.
4.
TheDVRwillattempttoconnecttoyournetwork’s
router. If it is successful, it will indicate that it is
connectedalongwithdisplayingyourLAN(Local
AreaNetwork)address.Thisistheaddresswhich
you will use when accessing the DVR from a
computer or mobile device on the same network
(ie; within the same building as the DVR).
If the attempt is unsuccessful, ensure that your
DVR is properly connected before clicking on
Prev. and trying again.
5. In the next series of windows, your DVR will
attempt to establish connectivity to the Internet
throughyourrouterusingtheUPnPprotocol.
Most routers have this functionality.
NOTE: 2WirebrandroutersdonotofferUPnPand
you will need to consult the Networking Guide
poster to connect your DVR to the Internet.
If you experience difficulties, please consult
yourrouter’smanualtoensurethattheUPnP
functionality is available and is enabled on your
router. Once you have adjusted your settings, you
may click on Prev. Step to go back and try again.
You may get an error message if you attempt to
run the wizard a second time after a successful
connection.
6. If it is able to successfully communicate with
therouterthroughUPnP,theDVRwillaccess
the ports which you will use to control and view
the system over the Internet and it will indicate
success.
TheDVRwillalsodetermineitsInternetorWAN
(Wide Area Network) address which it will display
inthenalwindowofthisstep.ThisistheIP
address which you will enter into a browser
window or remote monitoring program when away
from your network.
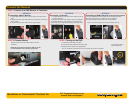
STEP 4 Startup Wizard
IMPORTANT! You must follow these steps to enter the current date and time in order to effectively use the video search function described at the end of this guide.
Your DVR features a Startup Wizard that will guide you through the initial setup process including connecting your system to your network and the Internet. This Wizard should only be run during initial setup and should
be turned off once you’ve completed setup.
1
2
3
4
6
Write down your network addresses:
Local Address:___________________________________
Internet IP Address: _______________________________
Please note that even after you have connected your
DVR to the network, you will still need to consult the
Remote Network Poster included with your DVR in
order to fully access the Remote Monitoring function.