


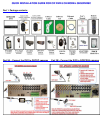


Part 5 – Accessing the DVR menus
To access the settings on the DVR push the Menu button on the front of the DVR or on the remote. This will display the screen in Pic 5.1.
Use the keypad on the DVR or remote to enter the User name and password. The default user is admin and the default password is 12345.
This will bring up the screen in Pic 5.2 where you can access the DVR’s functions. You can use the Direction keys to move the cursor (white
box in Pic 5.2) and the ENTER button to select the option you want.
Pic 5.1 Pic 5.2
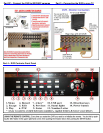
Part 6 – Setting up DVR to record
There are 3 modes for recording:
1. Manual Recording:
Push the RECORD button. Enter name and password (default is admin and 12345) as in Part 5. This will display the screen in Pic 6.1. In
Start/Stop heading use Arrow keys & ENTER button to put check marks in all cameras you want to record, or you can select Start All option
(green box) to record on all cameras. After you press the ENTER button the screen will return to camera preview screen and the record line
(REC) line on the bottom of the screen will be pink for all cameras selected (Pic 6.2).
Pic 6.1 Pic 6.2
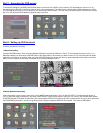
2. Motion Detection Recording:
Follow instructions in part 5 to go to main menu. Go to IMAGE option (red square in Pic 6.3) and hit ENTER, This will display the screen in
Pic 6.4. Select the camera (red square), Go down to MOTION DET LEVEL (green square), set it to 2 or 3 (normal), Go to AREA (blue square),
hit ENTER and push PTZ button to select the entire area and push ENTER to exit. Next go to COPY (yellow square) to copy to all cameras and
click CONFIRM (pink square). You have to go back to each camera to setup the AREA for each camera. Then return to Main Menu.
Pic 6.3 Pic 6.4