


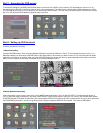


Now go to RECORDING (green square in Pic 6.3) and hit ENTER, this will bring up the screen in Pic 6.5. Go down to ENABLE REC (green
square) and use the ENTER key to put a CHECK mark in it. Go to SCHEDULE (orange square) and hit ENTER. This will display the screen in
Pic 6.6. Select a day (orange square) and then Select ALL DAY (red square). REC TYPE select MOT. DET. (green square). COPY to all days
(blue square), select CONFIRM (yellow square) and hit ENTER.
Restart the DVR. When it records on Motion, the light at the bottom REC line will be Blue for selected cameras (red square on Pic 6.7).
Pic 6.5 Pic 6.6 Pic 6.7
3. Time Schedule Recording.
Follow instructions in part 5 to go to main menu. Now go to RECORDING (green square in Pic 6.3) and hit ENTER, this will bring up the screen
in Pic 6.8. Go down to ENABLE REC (green square) and use the ENTER key to put a CHECK mark in it. Go to SCHEDULE (orange square)
and hit ENTER. This will display the screen in Pic 6.9. Select a day (orange square) and then Select ALL DAY (red square). Set record type to
All Time (green square). Set the Schedule start and End time for each day (yellow square). COPY to all days (blue square), select CONFIRM
(pink square) and hit ENTER. When the schedule starts recording the REC line will be green (red square in Pic 6.10)
Pic 6.8 Pic 6.9 Pic 6.10
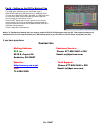
Part 7 – Setting up the DVR to Playback
To play back recordings push the Play button to enter Playback Mode. System will request user name and password (default is admin and
12345) Then display the Play Back screen in Pic 7.1. Select the camera you want to view files from (red square). Click on Search button to
display files (green square). Select the file you want to play (blue square), push the ENTER button and the file will play. When the playback
starts the screen in Pic 7.2 will be displayed. The bar at the bottom of the screen shows you how far into the file you are as a percentage (red
square), what speed you are playing back (yellow square), how far you are into the file in minutes/seconds and how long the file is in
minutes/seconds (green square). You can adjust the playback speed using the up and down arrows on the front panel or remote. Push on
ESC button to return to list.
NOTE: Recording will not be interrupted while you are in Playback mode.
Pic 7.1 Pic 7.2