


Q-SEE QUICK INSTALLATION GUIDE
M
M
O
O
D
D
E
E
L
L
N
N
U
U
M
M
B
B
E
E
R
R
Q
Q
R
R
4
4
0
0
7
7
4
4
-
-
4
4
2
2
6
6
4 | Page
PART 4 - ACCESSING THE DVR MENUS
PART 5 - SETTING UP CAMERAS FOR VIEWING AND RECORDING
PART 6 - TO START RECORDING
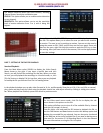
Using higher resolution and quality settings results in better video quality, but takes up more space on the hard drive.
Choosing lower settings result in lower video quality, but takes up less space on the hard drive.
AUDIO: If audio is ENABLED sound will be recorded with the video from the channels, and will have audio output in
playback mode. If audio is DISABLED, sound will not be recorded, and there will be no audio output in playback mode
(Audio cameras or a microphone is required to record the sound).
REC MODE: Sets DVR to record on Manual, Motion Detection, and Time Schedule Recording (detailed instructions
below).
PACK TIME: Choose the time length of all recorded files: 15, 30, 45, 60 min.
(Max = 60 min)
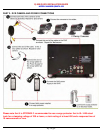
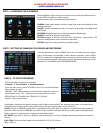
Choose MENU by right clicking on the mouse or by pushing the MENU button
on the DVR front panel or remote control.
The Main Menu offers the following Setup Features:
CAMERA: Setup name display, position, image view, and record quality of each
channel (cameras).
RECORD: Enable recording & audio, set resolution & quality, recording mode
and file size.
NETWORK: Setup Network access (Remote Internet Monitoring).
SEARCH: Find files for playback and backup.
DEVICES: Manage & Format hard drive and USB devices, setup alarms, PTZ
cameras, mobile phone access and motion detection.
SYSTEM: Setup time, date, password, and video mode.
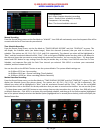
From the Main menu, select CAMERA. Here you can setup the name display
(up to 8 characters) and position of each channel (cameras). Select COLOR
SETUP to adjust the image brightness, saturation, contrast and hue settings
for each channel (camera). You can also choose whether each channel can be
previewed in LIVE MODE and/or RECORDING MODE.
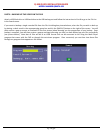
This System offers 3 modes for recording:
1. Manual 2. Time Schedule 3. Motion Detection.
From the main menu, select RECORD to enter into the Record Setup
menu (shown at right).
CHANNEL: “ON” enables video to record from the respective camera. If
the channel is set to “OFF”, video from that channel will not record.
RESOLUTION: D1=704x480, HD1=704x240, CIF=352x240
QUALITY: Best, Good, Normal