


Q-SEE QUICK INSTALLATION GUIDE
M
M
O
O
D
D
E
E
L
L
N
N
U
U
M
M
B
B
E
E
R
R
Q
Q
T
T
4
4
2
2
8
8
-
-
4
4
0
0
3
3
12 | Page
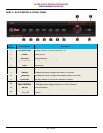
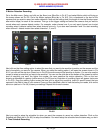
PART 8 - SETTING UP THE DVR TO BACKUP FILES
The DVR supports backing up to a USB flash drive, USB hard drive, and USB burner. You can also backup to a PC
through an Internet Explorer browser (refer to 7.6.2 Remote Backup in the user’s manual). Go to the Main menu and
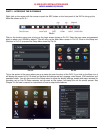
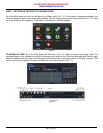
click on the Backup icon (Orange box in Pic 8.1). This will open the Backup screen shown as Pic 8.2. Set the start
time and end time and click on the Search button (Blue button in Pic 8.2). The files from the search period will be
displayed in the left hand window. Put a checkmark in the box on the left side of the channel number for the file or
files you want to backup, or put a checkmark in the All box on the bottom of the window to select the files that you
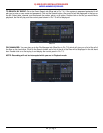
want to backup (Green checkmarks in Pic 8.2). Click on the Backup button (Red box in Pic 8.2), the Backup Info box
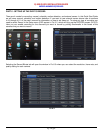
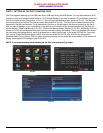
shown as Pic 8.3 will be displayed that gives you the information about the backup. There is a dropdown box where
you can select the backup device, and a drop down box to select the file type. If you select DVR as File Type, then
You need to Check the BackUp player option. Also you can select AVI as File type, this File can be played in
Windows Media Player directly. Click on apply to start the backup and a process bar at the bottom of the screen will
display the progress of the backup (refer to Pic 8.3).
NOTE: If you stop recording while backing up the files, the backup will go faster.
Pic 8.1 Pic 8.2
Pic 8.3