


Q-SEE QUICK INSTALLATION GUIDE
M
M
O
O
D
D
E
E
L
L
N
N
U
U
M
M
B
B
E
E
R
R
Q
Q
T
T
4
4
2
2
8
8
-
-
4
4
0
0
3
3
9 | Page
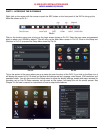
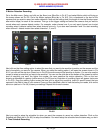
3. Motion Detection Recording:
Go to the Main menu, Setup, and click on the Alarm icon (Blue Box in Pic 6.7) and select Motion which will bring up
the screen shown as Pic 6.8. Go to the Motion options (Blue tab in Pic 6.8). Put a checkmark in the box for the
cameras that you want to record on motion detection. Next set the holding time (the length of time the file stays open
after motion stops) for each of the cameras. Then go to the trigger setting and select the cameras that you want to
record when each camera detects motion. For example, under channel one if you only want channel one to start
recording when it detects motion then select channel one only. If you also want cameras 2 and 3 to start recording
when channel 1 detects motion then select channels 1, 2, and 3.
Pic 6.7 Pic 6.8
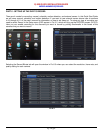
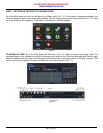
Next click on the Area setting option to select the area that you want to be sensitive to motion on the camera and the
level of sensitivity you want for the camera. When you select the setting option it will open the screen shown in Pic
6.9. If you click on the star icon (Green box in Pic 6.9) the entire area will be sensitive to motion. You can also use the
mouse to select an area that you want to be sensitive. You can use the slide bar at the bottom of the screen to set the
level of sensitivity you want, the higher the number, the more sensitive the motion detection. Click on the icon
showing a silhouette of a person (yellow arrow in Pic 6.9) and an illustration of a walking figure will appear (red arrow
in Pic 6.9). Drag the walking figure across the blue grid to adjust the sensitivity levels of specific areas that are
captured in the field of view of your camera. Once you have identified a field of view that suits your needs, click on the
save icon (red box in Pic 6.9) to save your settings. Repeat this for each camera.
Pic 6.9
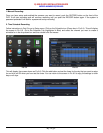
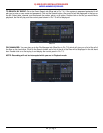
Next you need to setup the schedule for when you want the cameras to record on motion detection. Click on the
Schedule tab (Black tab in Pic 6.8) to setup the schedule. You would setup the schedule here the same way you do in
2. Time Schedule Recording.