


40D-Link DCS-930 User Manual
Section 4 - Security
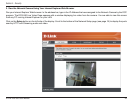
D-Link’s DCS-930 is a versatile and cost effective Network Camera offering both video and audio monitoring. It can also serve as a powerful
surveillance system in security applications. The DCS-930 can be used with any wired or 802.11n/g wireless router. This section explains
how to view the camera from either the Internet or from inside your internal network.
Materials Needed:
• 1 DCS-930 Network Camera
• 1 Ethernet Cable
• A Wired or Wireless router such as the D-Link DIR-655 Wireless Router
• Ethernet based PC for system conguration
Setting up the DCS-930 for Use Behind a Router
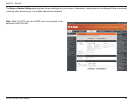
Installing a DCS-930 Network Camera on your network is an easy 4–step procedure:
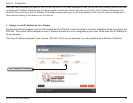
1. Assign a Local IP Address to Your Network Camera
2. View the Network Camera Using Your Internet Explorer Web Browser
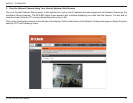
3. Access the Router with Your Web Browser
4. Open Virtual Server Ports to Enable Remote Image Viewing
This section is designed to walk you through the setup process for installing your camera behind a router and enable remote video viewing.
For the basic setup of the DCS-930, follow the steps outlined in the Quick Installation Guide.
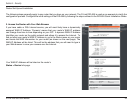
After you have completed the setup of the DCS-930 outlined in the Quick Installation Guide you will have an operating camera that has an
assigned IP Address. Because you are using a router to share the Internet with one or more PCs, the IP Address assigned to the Network
Camera will be a local IP Address. This allows viewing within your Local Area Network (LAN) until the router is congured to allow remote
viewing of the camera over the Internet.
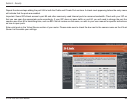
Using & Conguring the DCS-930 with a NAT Router