


MHD56012 - Edition 8 7
3. HOOK LATCHES. Check operation of hook latches. Replace
if broken or missing.
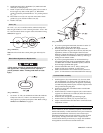
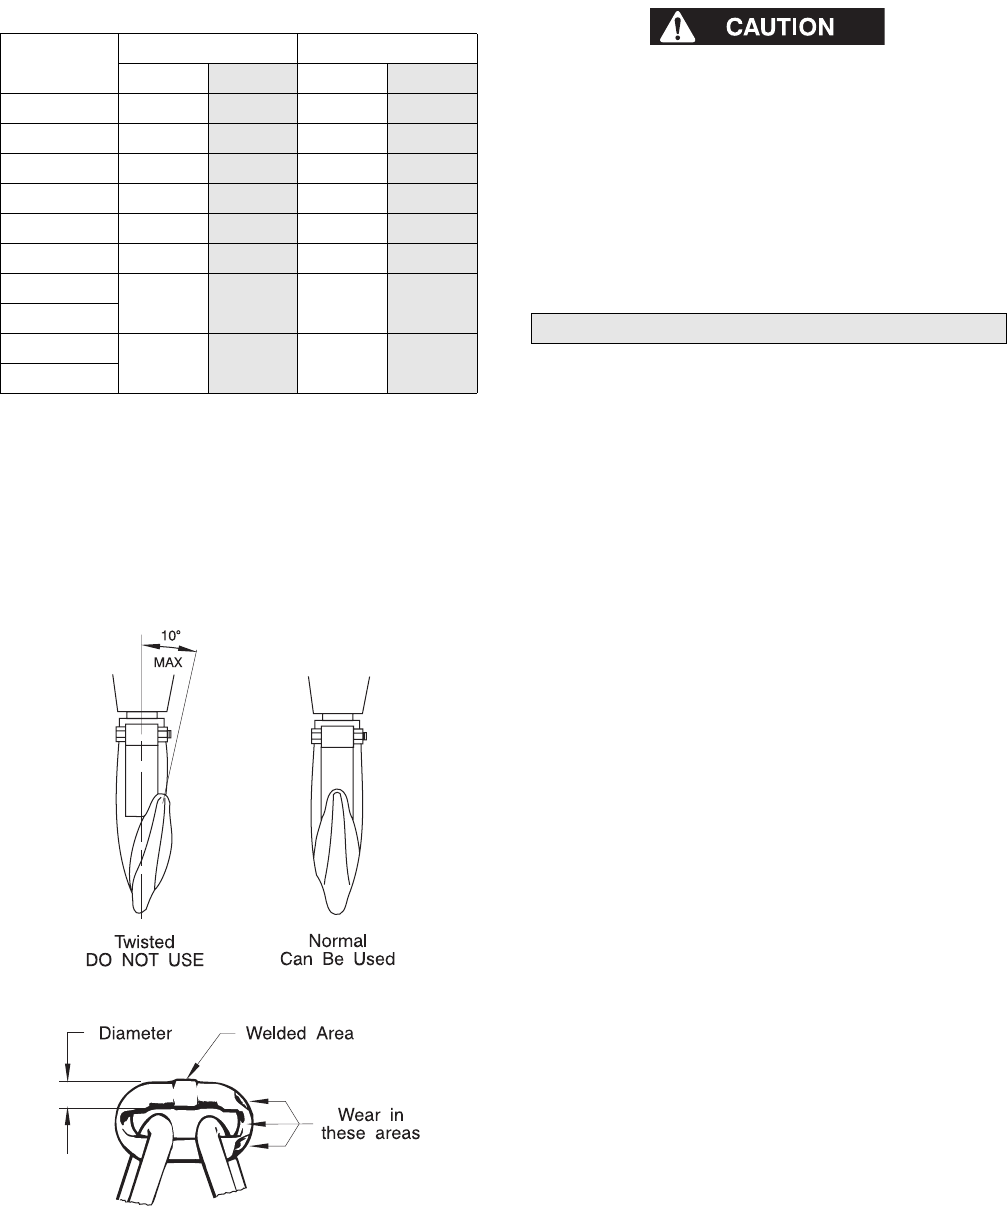
4. CHAIN. Refer to Dwg. MHP0102 on page 7. Examine each
link for bending, cracks in weld areas or shoulders, transverse
nicks and gouges, weld splatter, corrosion pits, striation
(minute parallel lines) and chain wear, including bearing
surfaces between chain links. Replace a chain that fails any of
the inspections. Check lubrication and lubricate if necessary.
Refer to “Load Chain” in “LUBRICATION” section.
(Dwg. MHP0111)
(Dwg. MHP0102)
• The full extent of chain wear cannot be determined by visual
inspection. At any indication of chain wear inspect chain and
load sheave in accordance with instructions in “Periodic
Inspection.”
• A worn load chain may cause damage to load sheave. Inspect
load sheave and replace if damaged or worn.
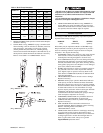
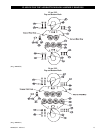
5. LOAD CHAIN REEVING. Refer to Dwg. MHP0042 on
page 9. Make sure welds on standing links are away from
load sheave. Reinstall chain if necessary. Make sure chain is
not capsized, twisted or kinked. Adjust as required.
Periodic Inspection
According to ASME B30.16, frequency of periodic inspection
depends on the severity of usage:
NORMAL HEAVY SEVERE
yearly semiannually quarterly
Disassembly may be required for HEAVY or SEVERE usage.
Keep accumulative records of periodic inspections to provide a
basis for continuing evaluation. Inspect all items in “Frequent
Inspection.” Also inspect the following:
1. FASTENERS. Check rivets, capscrews, nuts, cotter pins and
other fasteners on hooks, hoist body and chain bucket, if
used. Replace if missing and tighten or secure if loose.
2. ALL COMPONENTS. Inspect for wear, damage, distortion,
deformation and cleanliness. If external evidence indicates
the need, disassemble. Check gears, shafts, bearings, sheaves,
chain guides, springs and covers. Replace worn or damaged
parts. Clean, lubricate and reassemble.
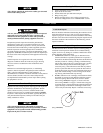
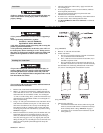
3. HOOKS. Inspect hooks for cracks. Use magnetic particle or
dye penetrant to check for cracks. Inspect hook retaining
parts. Tighten, repair or replace if necessary. Refer to the
latest edition of ASME B30.10 (Hooks) for additional hook
inspection information.
4. CHAIN SHEAVES. Check for excessive wear or damage.
Replace if necessary.
5. BRAKES. Ensure proper operation. Brake must hold hoist
rated capacity. If load test indicates the need, disassemble.
Brake discs must be free of excess oil, any grease, unglazed,
uniform in thickness and at least 5/64 in. (2 mm) thick. Check
all other brake surfaces for wear, deformation or foreign
deposits. Inspect pawl brake. Teeth of ratchet gear should be
undamaged, and should stop gear rotation in the
counterclockwise direction. Check pawl spring for damage.
Clean and replace components as necessary.
6. SUPPORTING STRUCTURE. If a permanent structure is
used, inspect for continued ability to support load.
7. LABELS AND TAGS. Check for presence and legibility.
Replace if necessary.
8. END ANCHOR. Ensure end anchor on chain hoist is
engaged and unbent. Repair if damaged, replace if missing.
Refer to “Attaching End of Load Chain” in
“MAINTENANCE” section.
9. LOAD CHAIN. Measure chain for stretching by measuring
across five link sections all along chain. Refer to Dwg.
MHP0041on page 8 and Table 2. When any five links in the
working length reach or exceed discard length shown in
Table 2, replace entire chain. Always use a genuine
Ingersoll-Rand replacement chain.
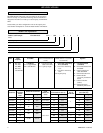
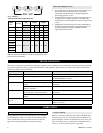
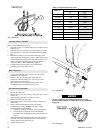
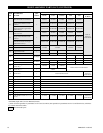
Table 1: Hook Throat Dimension
Model No.
Throat Width Discard Width
in.
mm in. mm
VL2-005 1.22
31 1.4 35.6
VL2-010 1.33
34 1.54 39.1
VL2-015 1.5
38 1.72 43.7
VL2-020 1.61
41 1.86 47.2
VL2-030 1.85
47 2.12 54
VL2-050 2.01
51 2.31 58.6
VL2-080
2.8 71 3.21 81.6
VL2-100
VL2-150
3.54
90 4.07 103.5
VL2-200