


76 EN
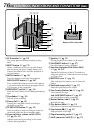
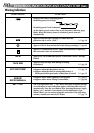
CONTROLS, INDICATIONS AND CONNECTORS
(Cont.)
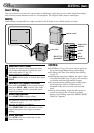
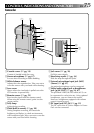
$ %
#
^
&
*
)
w
r
y
(
q
e
t
u
i
o
Qp
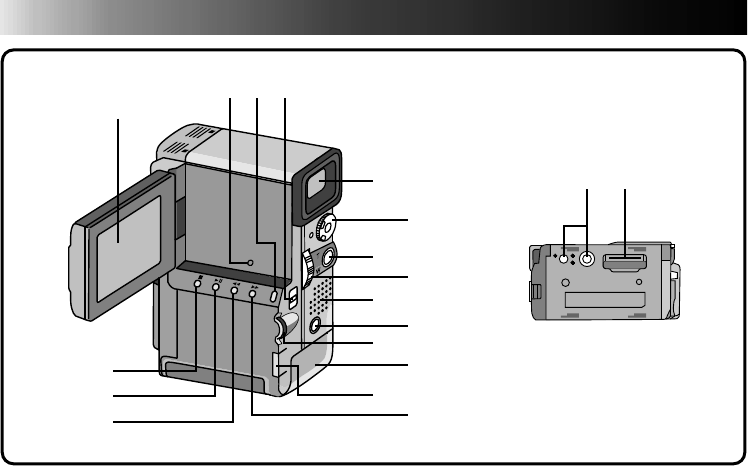
q Speaker (੬ pg. 51)
During playback, the sound can be heard.
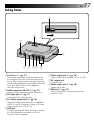
wSNAPSHOT button (੬ pg. 27)
Press this button to take a snapshot.
eFunction Navigator Dial (Select Dial)
(
੬ pg. 24, 32)
Adjusts the brightness of the LCD monitor or
selects the Menu etc. Referred to in this manual
as “Select Dial”
rBATTERY cover (੬ pg. 11)
Slide and open the battery cover to insert the
battery.
tSub hand strap eyelet (੬ pg. 17)
Attach the grip strap to this eyelet.
yFast-Forward button (
3
) (੬ pg. 51)
Fast-Forwards the tape.
Sub SNAPSHOT button (੬ pg. 27)
Press this button to take a snapshot.
uRewind button (
2
) (੬ pg. 51)
Rewinds the tape.
iPlay button (6/
4
) (੬ pg. 51)
Plays back or stops the tape temporarily.
oStop button (5) (੬ pg. 51)
Stops playback of the tape.
pTripod mounting socket (੬ pg. 17)
QMulti connector (MULTI) (੬ pg. 57)
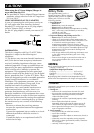
# LCD monitor (੬ pg. 25)
The image appears during recording or play-
back.
$ RESET button (੬ pg. 73)
When a malfunction occurs, press this button
after removing the power supply (battery etc.).
Pressing this button also resets the date/time or
various settings.
% MENU button (੬ pg. 32)
Press this button to make the Menu appear.
IND.ON/OFF button (੬ pg. 24)
Press and hold this button for more than approx.
1 second to make the indications appear on the
LCD monitor or the viewfinder.
^ OPEN/EJECT switch (੬ pg. 14)
Slide the switch down when loading/unloading a
tape.
& Viewfinder (੬ pg. 18)
Pull out when recording.
* Power dial (੬ pg. 21)
Turning the camcorder on/off, recording or
playback is possible.
( START/STOP button (੬ pg. 21)
Starts recording or stops recording to make the
camcorder enter the record-standby mode.
) Zoom switch or volume switch (VOL.)
(
੬ pg. 26, 51)
Adjusts zoom during recording or the sound
volume during playback.
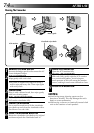
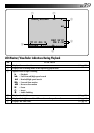
Bottom of the camcorder