


44 EN
1
2
3
4
5
6
7
8
IN
0
:
00
:
25
0
:
03
:
18
0
:
02
:
33
0
:
04
:
11
0
:
04
:
11
0
:
01
:
13
OUT
0
:
01
:
05
0
:
03
:
31
0
:
02
:
53
--
:
--
:
--
COUNTER
TOTAL
1
2
3
4
5
6
7
8
IN
0
:
00
:
25
0
:
00
:
25
0
:
00
:
00
OUT
--
:
--
:
--
COUNTER
TOTAL
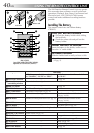
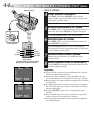
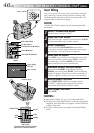
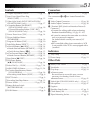
SELECT SCENES
4
START SOURCE PLAYBACK
Press PLAY, then press ON/OFF on the remote
control. Make sure to point the remote control at the
camcorder’s remote sensor.
•The R.A. Edit counter display appears.
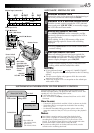
5
REGISTER BEGINNING OF SCENE
Press REW or FF to locate the beginning of the scene
you want, then press IN/OUT to register that point.
•The data appears under “IN” on the display.
6
REGISTER END OF SCENE
Press REW or FF to locate the end of the scene and
press IN/OUT to register it.
•The data appears under “OUT” on the display.
•The total time of the registered scene(s) is displayed
at the bottom of the screen.
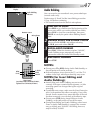
7
REGISTER ADDITIONAL SCENES
Repeat steps 5 and 6 for each additional scene
(as many as 8).
8
MAKE CORRECTIONS (IF NECESSARY)
Press CANCEL during steps 5 and 6 to erase the most
recently registered point.
NOTES:
●
There must be at least one second between an in-point
and its corresponding out-point.
●
To ensure correct operation, there should be at least
15 seconds between an out-point and the next in-point.
●
Blank portions of a tape cannot be registered as in-points
or out-points.
●
If it takes more than 5 minutes to search for an in-point,
the VCR’s Record-Pause mode is cancelled and editing
does not take place.
●
Pressing ON/OFF clears all in- and out-points from
memory.
●
Leave a small margin for error around each in-point to
ensure the scene is recorded in its entirety.
●
Turning off the camcorder’s power erases all registered
in- and out-points.
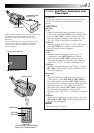
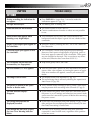
USING THE REMOTE CONTROL UNIT
(cont.)
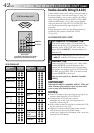
RM-V700U
(provided with GR-AX501/AX401,
optional for GR-AX301/AX201)
Remote sensor
Power Switch
REW
PLAY
IN/OUT
FF
PAUSE
ON/OFF
CANCEL