


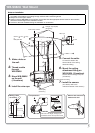

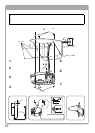

9
200 mm
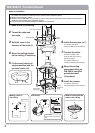
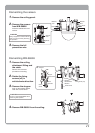
1.
Make a hole in the
ceiling.
Use the provided template.
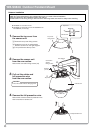
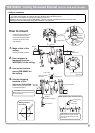
How to mount
Rotate the fixing screws (x3)
in anticlockwise direction,
shift the clamping brackets
upwards as shown on the
right diagram.
2.
Use a stopper to
temporarily secure
WB-S685U on the ceiling.
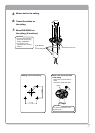
3.
Use anchor bolts to
secure WB-S685U on
the ceiling.
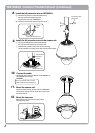
4.
Use the clamping
brackets (x3) to
secure on the ceiling.
Rotate the fixing screws (x3)
in clockwise direction.
Ceiling
5 mm~35 mm
Stopper
Rotate in
clockwise direction
Fixing screws
Anchor bolt
Anchor bolt hole
(3/8 inch)
Hexagon nut
When anchor bolts cannot be used
Wire rope
Screw driver
Clamping
brackets
Clamping brackets
To reinforcing
anchor
Front side of camera
<Top View>
Screw driver
Clamping
brackets
Fixing
screws
Rotate in
anticlockwise
direction
Making a hole in
the ceiling
Take note of the length, strength,
pull and material of the wire rope
to be used.
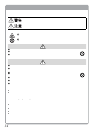
CAUTION
200 (7- )
Make sure the clamping brackets are
securely fastened.
CAUTION
1.
2.
3.
4.
Notes on Installation
● Check that the installation location is able to withstand the total weight of the camera, which is about 2.9 kg, before
you install. If the location is not strong enough, reinforce with a reinforcing board.
● The unit can be installed on ceilings of thickness up to 35 mm.
● Always use anchor bolts to secure WB-S685U. If anchor bolts are unavailable, be sure to use wire rope.
● Conform to the local standards during the installation or construction.
WB-S685U Ceiling Recessed Bracket (Not for USA and Canada)