


19
usb-lexmark_Z65 or USB001. To check the printer port and change it, if
necessary, follow the steps for your operating system.
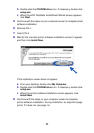
If your document did not print, print a test page:
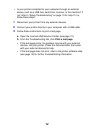
1 From your desktop, double-click the Lexmark Z65 Solution Center
icon.
2 From the Troubleshooting tab, click Print a test page.
– If the test page prints, your printer is working properly. Check
your software application documentation for troubleshooting
information.
– If the test page does not print, click the Help button on the error
message that appears or refer to the printer software Help (see
page 12).
Windows 98/Me Windows 2000 Windows XP
1 Click Start Settings
Printers.
2 Right-click the
Lexmark Z65 printer
icon, and then click
Properties.
3 Click the Details tab.
4 From the Ports
drop-down menu,
select the printer port.
5 If the correct port is
not listed, uninstall
and then reinstall the
printer software. For
help, see page 20.
6 Click OK.
1 Click Start Settings
Printers.
2 Right-click the
Lexmark Z65 printer
icon, and then click
Properties.
3 Click the Ports tab.
4 From the list of ports,
select the correct
printer port.
5 If the correct port is
not listed, uninstall
and then reinstall the
printer software. For
help, see page 20.
6 Click Apply.
7 Click OK.
1 Click Start Control
Panel Printers and
Other Hardware
Printers and Faxes.
2 Right-click the
Lexmark Z65 printer
icon, and then click
Properties.
3 Click the Ports tab.
4 From the list of ports,
select the correct
printer port.
5 If the correct port is
not listed, uninstall
and then reinstall the
printer software. For
help, see page 20.
6 Click Apply.
7 Click OK.