


2 MOUNT YOUR CAMERA Continued
8
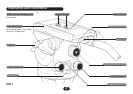
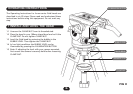
2.5 Attach your camera to the fluid head by holding your
camera slightly ‘lens down’ and place the attached
CAMERA PLATE under the front lip on the top of the
SLIDING PLATFORM. Lower the back of the camera until
the QUICK RELEASE snaps automatically to the locked
position. Ensure the QUICK RELEASE knob is firmly seated.
2.6 To ensure a successful mount, grip the PAN HANDLE firmly
and then disengage the PAN and TILT LOCKS. Your camera
should be firmly attached with no obvious free movement.
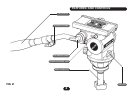
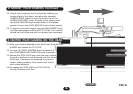
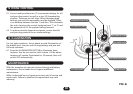
SLIDING PLATFORM
SLIDING PLATFORM LOCK
CENTRE AXIS
FIG 5
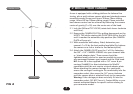
3 CENTRE YOUR CAMERA ON THE HEAD
3.1 With your camera attached to the fluid head, hold the PAN
HANDLE and release the TILT LOCK.
3.2 Turn the TILT DRAG CONTROL knob to position ‘0’. Turn
the COUNTERBALANCE SELECTOR knob to position ‘1’.
3.3 Release the SLIDE LOCK lever and slide your camera
forward or backward until balanced over the centre axis of
fluid head. If necessary, be prepared to stop your
camera sliding suddenly. Your camera will remain
static when balanced.
3.4 Re-engage the SLIDE LOCK and TILT LOCK by
turning clockwise until firm.