


Use of Iris Camera MEC-2-FL-D60-N105 8
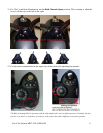
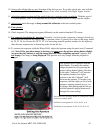
How To Take Perfect Iris Pictures
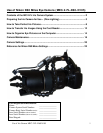
1. Be sure the client is comfortably seated and relaxed.
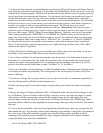
2. If a chinrest is not used, have the client open their own lids by putting the index finger touching the
thumb up to the closed eye (using the arm on the same side of the eye being photographed), and then
separating the index finger and thumb while holding them against the upper and lower lids
respectively. Often this method is helped by having the elbow of this arm on a table.
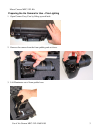
The client covers the eye not being photographed with one hand and separates the lids with the other.
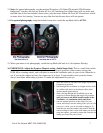
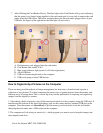
3. Have the client place the free hand
(opposite of the iris side being photographed) over the opposite
eye so as to prevent looking through it. Due to the fact that people have eye dominance (preferring to
use one eye more than the other), it is important to have the client only looking through the eye being
photographed, and looking straight into the camera lens. If people do not cover the opposite eye, they
tend to look around the room with the uncovered eye, causing the eye being photographed to wander.
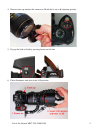
Often it is helpful to have the client spread apart the eyelids with the index finger and thumb.
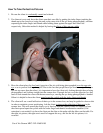
4. The client will see a small reflection of their eye in the camera lens, and may be guided to observe this
in order to maintain correct positioning. Ask the client to observe the reflection of their eye
in the
camera lens. This will ensure the client's eye is lined up with the camera. Often it is helpful to have
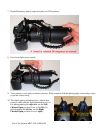
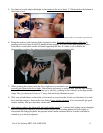
the client spread apart the eyelids with the index finger and thumb.An alternative method (if lid
retraction is not needed) is to have the client put the chin on the palm with the elbow on the table. For
the right iris picture, the right arm is used for support this way, and for the left iris picture, it is
reversed.