


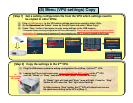


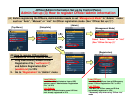

(8) Menu (VPU settings) Copy
(1) Plug an USB memory* to the VPU which settings need to be copied to other VPUs.
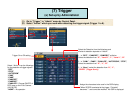
(2) Go to “Operations” in “Admin” menu by Control Panel and select “Menu Copy”.
(3) Press “Copy” button if you agree to copy menu settings to the USB memory.
*This action creates a setting configuration file in the USB memory. Please use the USB memory to get the setting
configuration file because even if inserting a P2 card instead to the VPU, it cannot be created in the P2 card.
[Step 1] Get a setting configuration file from the VPU which settings need to
be copied to other VPUs.
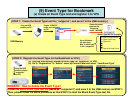
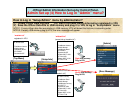
[Step 2] Copy the settings to the 2
nd
VPU.
(1) Plug the USB memory stored a setting configuration file at [Step 1] to the 2
nd
VPU.
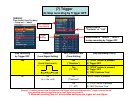
(2) Leaving the P2 card slot cover open, press and hold the REC button
on the 2
nd
VPU
until the “Ready” or “Busy” lamp starts to flash (about 10 seconds or more).
(3) “Ready” light will flash and “Busy” lamp will light. Press the “Stop”
button on VPU when the “Rec” light starts flashing.
(4) After pressing “Stop” button, the 2
nd
VPU will reboot and can see
the same menu setting as the VPU of [Step 1].
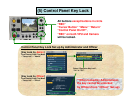
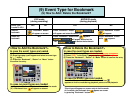
(2)
Keep pressing
REC button