


Preparation
9
VQT1C14
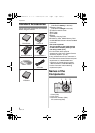
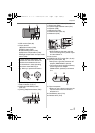
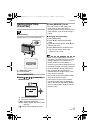
4 LCD monitor (P32, 88)
5 Cursor buttons
2/Self-timer button (P39)
4/[REV] button (P29)
1/Flash setting button (P35)
3/Exposure compensation (P40)/
Backlight compensation in simple mode
button (P26)
6 [MENU/SET] button (P15)
7 Status indicator (P19, 21)
8 [DISPLAY/LCD MODE] button
(P32, 34)
9 [FUNC] (P58)/Delete button (P30)
10 Camera ON/OFF switch (P10, 15)
11 Zoom lever (P26)
12 Optical image stabilizer button (P41)
13 Speaker (P68)
14 Microphone (P52)
15 Shutter button (P22, 52)
16 Mode dial (P16)
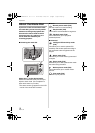
17 Strap eyelet
• When detaching the strap, untie the
knot in the string with a pointed object
and then detach it.
18 Lens barrel
19 [DIGITAL/AV OUT] socket (P81, 83, 87)
20 [DC IN] socket (P81, 83)
• Always use a genuine Panasonic AC
adaptor (DMW-AC5PP; optional).
• This camera cannot charge the battery
even though the AC adaptor
(DMW-AC5PP; optional) is connected
to it.
21 Tripod receptacle
• When you use a tripod, make sure the
tripod is stable when the camera is
attached to it.
22 Card/Battery door (P13)
23 Release lever (P13)
In these operating instructions, the
operations on the cursor button are
described as illustrated as shown.
The illustrations in these operating
instructions show DMC-FX12.
e.g.: When you press the 4 button
54
6 7 89
SET
MENU
REV
10 11 12
13 14 15 16
17
1
9
2
0
1
8
23
22
21
VQT1C14ENG.book 9 ページ 2006年12月4日 月曜日 午後11時0分