


8 VQT3H43 VQT3H43 9
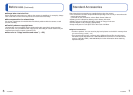
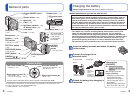
Names of parts
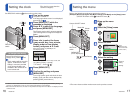
Charging the battery
Always charge before first use! (battery shipped uncharged)
Cursor button
Left cursor button (◄)
• Self-timer (→45)
Down cursor button (▼)
• Macro Mode (→42)
• AF Lock (AF Tracking) (→29, 74)
Up cursor button (▲)
• Exposure Compensation (→46)
• Auto Bracket (→47)
Right cursor button (►)
• Flash (→40)
●
In this manual, the button that is used is shaded or indicated by▲▼◄►.
Camera ON/OFF switch
(→16)
Shutter button (→25)
Mode dial (→26)
Flash (→40)
Self-timer indicator (→45)/
AF Assist Lamp
(→80)
Lens barrel
Lens
(→5, 122)
Zoom lever
(→32)
Microphone
∗
(→61)
Speaker (→19, 86)
LCD monitor
(→20, 39, 110, 116)
REC/PLAY switch
(→25)
[EXPOSURE] button
(→48, 49, 50)
[DISP.] button (→39)
Q.MENU/ [ / ]
(Delete/Return) button (→38, 83)
[AV OUT/
DIGITAL]
socket
(→103, 106, 109)
[E.ZOOM] button
(→35)
●
The appearance, specifications, and screen display vary depending on the model that is used.
●
The above illustration is of the DMC-ZS8/DMC-TZ18.
∗
The DMC-ZS9 has a stereo microphone.
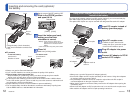
We recommend
using the supplied
hand strap to
avoid dropping
the camera.
Tripod receptacle
(→122)
Card/Battery door (→12)
Release lever (→12)
DC coupler cover
(→13)
■
About batteries that you can use with this unit
It has been found that counterfeit battery packs which look very similar to the
genuine products are made available to purchase in some markets. Some of
these battery packs are not adequately protected with internal protection to
meet the requirements of appropriate safety standards. There is a possibility
that these battery packs may lead to fire or explosion. Please be advised that
we are not liable for any accident or failure occurring as a result of use of a
counterfeit battery pack. To ensure that safe products are used we recommend
that a genuine Panasonic battery pack is used.
• Use the dedicated charger and battery.
• The camera has a function for distinguishing batteries which can be used
safely. The dedicated battery supports this function. The only batteries
suitable for use with this unit are genuine Panasonic products and batteries
manufactured by other companies and certified by Panasonic. (Batteries which
do not support this function cannot be used). Panasonic cannot in any way
guarantee the quality, performance or safety of batteries which have been
manufactured by other companies and are not genuine Panasonic products.
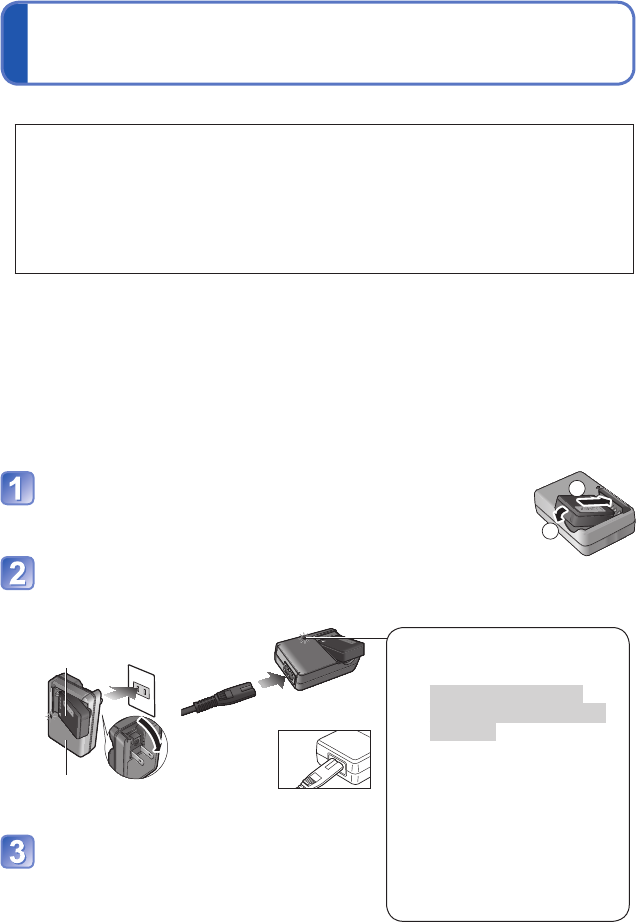
Insert the battery terminals and attach the battery
to the charger
1
2
Connect the charger to the
electrical outlet
●
Plug-in type
●
Inlet type
Battery
Charger
(model-specific)
• The AC
cable does
not fit
entirely into
the AC input
terminal. A gap will remain.
Charging light
([CHARGE])
On: Charging in progress
(Approx. 130 min. if fully
depleted)
Off: Charging complete
If light is flashing:
• Charging may take longer
than normal if battery
temperature is too high or
too low (charging may be
incomplete).
• Battery/charger connector is
dirty. Clean with a dry cloth.
Detach the battery after charging is
completed