-104-
ENGLISH
SELF SHOOT NOR. MIR.
C.RESET ----
7, 8
1
CAMERA FUNCTIONS
PRESS MENU TO EXIT
1.
CAMERA SETUP
2.
DIGITAL EFFECT
3.
TITLE SETUP
4.
DATE/TIME SETUP
5.
DISPLAY SETUP
6.
LCD/EVF SETUP
7.
OTHER FUNCTIONS
90 u
1
6
180 u
3
OPEN
MENU
FOCUS / SET
MF/
TRACKING
2, 4
2, 3
2, 5
7, 8
CAMERA
OFF
VCR
DISPLAY SETUP
PRESS MENU TO EXIT
TAPE 30
DISPLAY ALL
RETURN ----
1
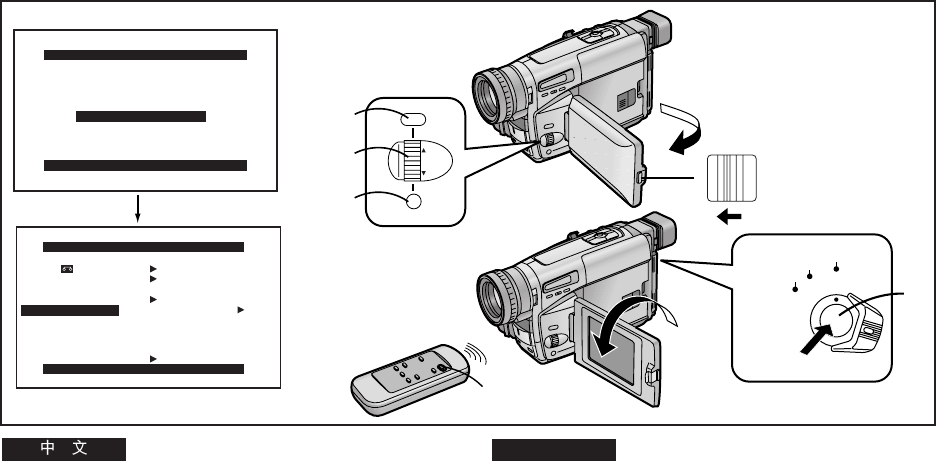
Recording Yourself with the LCD
Monitor Facing Forward
(NV-VZ9/VZ10 only)
Turning the LCD Monitor so that it faces forward, allows you
to aim the Movie Camera and view the picture in the Finder,
while the persons in front of the camera can check the picture
on the LCD Monitor during recording. If you mount the Movie
Camera on a tripod and use the °Remote Controller, you can
also take part in the action that you are recording and check
the picture from the front on the LCD Monitor.
°Remote Controller: NV-VZ10 only
1 Slide the [3OPEN] Lever to the left and
simultaneously open the LCD Monitor in the
direction of the arrow approximately 90x.
2 Display the [DISPLAY SETUP] Sub-Menu. (l 28)
3 Turn the [34] Dial to select [SELF SHOOT].
4 Press the [SET] Button to select the desired
mode ([NOR.] or [MIR.]).
≥[NOR.] means Normal Mode.
≥[MIR.] means Mirror Mode. (l 106)
5 Press the [MENU] Button to exit the menu.
6 Turn the LCD Monitor until it faces forward
approximately 180x.
7 Press the Recording Start/Stop Button 1.
∫ Stopping Recording
8 Press the Recording Start/Stop Button 1.
!"#$%&'()*+,-
!ksJswVLswNM
!"#$%&'()*+',-./0123456'7
!"#$%&'()*+),-./0(&1)234,
!"#$%&'()*+,-./0123456789
!"#G !"#$%&'()*+,-./"01
!"#$%&'()*'+
G ! ksJswNM
1
!
x
3lmbk
z
!"#$%&'()*&
!"#VM
2
x
afpmi^v=pbqrm
z
! !
l
=OU
3
x
34
z
!
x
pbic=pellq
z
!
4
x
pbq
z
!"#$%&
x
kloK
z
x
jfoK
z
≥ xkloKz !"#$%
≥ xjfoKz !"#$%
l
=NMS
5
x
jbkr
z
! !"#$
6
!"#$%&'()*+,-NUM
7
!"L
1
∫ !"
8
!"L
1


