Installation Using E1003 Mounting Plate
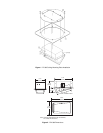
To install the EH1000 Ceiling Enclosure in dropped or false ceilings utilizing the E1003 Mount-
ing Plate, perform the following steps. Refer to Figure 1.
The E1003 is supplied as follows:
Quantity Description
1 Plate, square
1 Plate, round
8 Spacers
8 Screws, 10-32 x 1-inch
1. Place the E1003 (square and round plates, items 1 and 2) on a flat surface with the
painted surface up.
2. Open the lid of the enclosure (EH1000) and insert the enclosure into the rectangular opening.
3. Position the spacers (item 3) provided between the mounting flange of the enclosure and
the round plate of the E1003, aligning them with the eight mounting holes.
4. Secure the enclosure to the E1003 with the screws (item 4) provided, making sure the
screws pass through the spacers. Tighten the hardware.
5. Mount the enclosure into the 2 ft x 2 ft opening in the ceiling.
6. Refer to steps 3, 5, 6, and 7 in the previous section for final installation instructions.
CARE AND MAINTENANCE
Regularly scheduled maintenance will prolong the operational life and appearance of the equipment.
1. If dust or other debris accumulates on the inside of the lower enclosure, remove the par-
ticles with clean air pressure only. Compressed air cans are available from commercial
photographic equipment and supply dealers.
2. Clean the outer surface of the enclosure and the inner surface of the viewing window with
a non-abrasive cleaning cloth and anti-static cleaner that is safe for use on acrylic plastic.
Do not use kerosene or similar substances that can scratch the surface.
SPECIFICATIONS
MECHANICAL
Camera Mounting: Adjustable bracket; supports a 10-pound (4.5 kg) maximum load
Max.
Camera/Lens Size: Accepts camera/lens combinations up to 4.5" H x 15.0" L x 6.5" W
(11.43 x 38.10 x 16.51 cm)
Ceiling Mounting: Upper section flange-mounted to fixed ceiling or E1003 rotating mounting
plate for false ceilings
Viewing Window: Lucite
®
SAR (Super Abrasion Resistant Acrylic)
Cable Entry: Conduit knockouts
Lock: Key lock
GENERAL
Certification: UL listed, NEMA Type 1 enclosure suitable for plenum use
Construction: Upper section, 5052-H32 aluminum
Lower section, vacuum-formed ABS plastic
Color: Upper section, alodine
Lower section, white textured
Dimensions: See Figure 2
Weight: 5 lb (2.268 kg)
(Design and product specifications subject to change without notice.)
NOTE:
The instructions pro-
vided are for installation in a
2' x 2' ceiling tile. If mounting in
a 2' x 4' ceiling tile, you will need
to cut the ceiling tile in half and
install an additional “T” rail for
support.
CAUTION:
Do not
use water, liquid or spray
cleaners of any kind on
inner surface of the enclosure.


