Pelco Manual C1415M-PSA (12/97) 3
3.0 INSTALLATION
1. Unlatch and raise the enclosure lid. The gas spring will hold the lid in place
when it is fully opened.
2. Remove the parts tied to the camera sled
3. Remove the elevator from the camera sled.
4. Mount the camera to the elevator with the 1/4-20 Phillips-head screws that are
provided in the parts bag.
5. Install the elevator and camera in the enclosure:
a. Loosen the screws that hold the camera sled in place.
b. If the camera’s lens is adjustable, extend the lens to its maximum length.
c. Place the elevator on the camera sled, but do not install the elevator.
d. Slide the camera sled forward until the lens almost touches the window.
e. Remove the camera and elevator and tighten the camera sled screws.
f. Install the elevator and camera on the camera sled.
6. Connect the video cable in the enclosure to the video output connection on
the camera.
7. If you are going to synchronize cameras, connect the synchronization cable in
the enclosure to the synchronization connection on the camera.
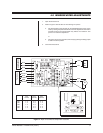
8. If your camera has a motorized zoom lens control, connect or wire the camera’s
lens control to the LENS CONTROL connector inside the enclosure. Refer to
Figure 3.
9. Wire power to the camera. Refer to Figure 3.
10. Adjust the focus and iris on the camera, if necessary.
11. Close the enclosure lid and mount the enclosure to the pan/tilt unit:
a. Lift the enclosure over the pan/tilt unit and carefully lower the enclosure
into the pan/tilt unit to mate the 26-pin RediLINK™ D-type connectors in
the shaft of the pan/tilt unit and on the bottom of the enclosure.
b. Once the connectors are mated, apply firm pressure downward and to
the back of the enclosure to fully seat the enclosure in the pan/ tilt unit.
c. Slowly remove your hands from the enclosure, making sure that the en-
closure is balanced on the pan/tilt unit.
d. With the 5/32 Allen wrench that is supplied with the enclosure, tighten
the two set screws on the back of the enclosure where it mounts to the
pan/tilt unit.
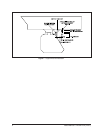
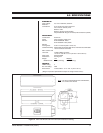
e. Install the support bracket as shown in Figure 1. Apply silicone sealant
(such as Bostik #9732 or equivalent) between the bottom of the bracket
and the top of the enclosure. Fasten the bracket to the top of the enclo-
sure and the tilt shaft of the pan/tilt unit with the screws, split lock wash-
ers, and sealing washers that are supplied.
CAUTION:
Camera
power must be the same
as the AC power for the
enclosure.
CAUTION:
Failure to
tighten the screws or to in-
stall the support bracket
may result in damage to
the enclosure when you
operate the camera.


