C1465M-A (9/06) 3
Installation
The following items are supplied:
1Enclosure
1 Parts bag (Parts may be used to attach the camera to the mount.)
1 Hex bolt, 1/4-20 x 1/2"
1 Split washer
1Flat washer
1 Backup flanges to support the enclosure if adequate mounting support is not available or if enclosure is mounted in drop ceiling tiles
1 Pin-in-hex wrench to remove tamper-resistant screw
Recommended Tools
Pelco does not supply the basic tools needed for the installation process. The following tools are recommended:
Small adjustable wrench
Phillips screwdriver
BNC crimp tool
Wire stripper
Wire cutter
Coaxial cable stripper
BACK BOX INSTALLATION
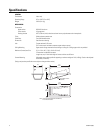
To mount the HS2100, perform the following steps:
NOTE: Backup flanges have been supplied to support the enclosure if adequate mounting support is not available or if you are mounting the
enclosure in drop ceiling tiles.
1. Determine the location and direction of the enclosure to be mounted. Ideally, the enclosure cutout should be parallel and adjacent, or
perpendicular, to any ceiling structure. Avoid cutting into any ceiling structural members.
2. Unlock the enclosure cover by unscrewing the tamper-resistant screw (pin-in-hex wrench is included to remove tamper-resistant screw).
Open the cover to expose the mounting holes in the flange.
3. Remove any appropriate knockouts.
4. Insert the enclosure into the opening and secure with the appropriate fasteners.
CAMERA AND LENS INSTALLATION
To mount the camera and lens, perform the following steps:
1. Mount the camera and lens onto the adjustable camera cradle. Adjust the position of the camera and lens to clear the enclosure cover
when closed. Tighten the camera cradle fasteners.
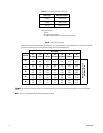
2. Route the appropriate cables into the enclosure. Make all necessary electrical connections. Refer to Table A for the type of video coaxial
cable to use. If the camera will use 24 VAC power, refer to Table B to determine the size of wire needed.
3. Close and lock the cover with the provided tamper-resistant screw.


