


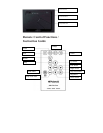
Getting Started
1. Plug the AC adapter into the Digital Photo Picture Frame and plug it into a wall outlet.
2. Insert a memory card into one of the two slots:
Slot 1 - Secure Digital™, MultiMedia Card™ or Memory Stick™
Slot 2 - Compact Flash™
3. Turn on the Power Switch on the back of the Digital Picture Frame. System will access Card Select Page.
4. Press the È or Ç button to select card’s type and press the Play/Pause ( / II) button to confirm your
choice. System will enter Thumbnail Mode.
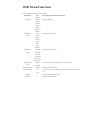
5. Press the EXIT button to access OSD Menu (SETUP menu). Press the EXIT button again to select
submenu and press he Play/Pause ( / II) button to confirm your choice.
Viewing Pictures
1. Press the È or Ç button to chose the picture you want and press the Play/Pause ( / II) button to display.
2. Press the EXIT button contiguously for three seconds to back to Thumbnail Mode.
3. Press the È button to the last picture of current display page, then press È button again, PREW or NEXT
will be highlighted. Press È or Ç button to enter next page or previous page.
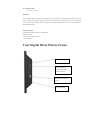
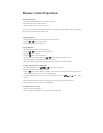
Use Control Buttons to setup OSD Menu
All function settings for the Digital Photo Picture Frame can be controlled via the buttons located on the top
of the frame. You will be able to access the on screen display (OSD) at any time, except when in Slide
Show Mode, by simply holding down the “EXIT” button for three second or press remote control setup
button.
After you access the OSD menu:
1. Press the EXIT button to select the up-class menu.
2. Press the È button to enter it.
3. Press the EXIT button to select the setting functions.
4. Press the Play/Pause ( / II) button to confirm your choice.
5. Press the Ç button and press the Play/Pause ( / II) button to exit the current menu.
6. Press the EXIT button to select option “Exit Setup”.
7. Press the Play/Pause ( / II) button to confirm.