


Introduction
The PROMASTER LED336 LED LIGHT will help you get amazing video and photos with your digital
still camera or camcorder. This ultra-bright light operates off of either a rechargeable lithium battery
for complete portability or A/C power for maximum shooting time. The included remote control not
only controls the various functions of the light, including the brightness, but also doubles as an
infrared remote control for cameras supporting this function. Use it on your camera or set up multiple
units to get the lighting you desire.
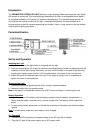
Parts Identification
Set Up and Operation
Installing the Light
1. Rotate the mount of the light so that it is aligned with the light.
2. Insert the mounting foot (5) of light into camera’s mounting shoe and rotate the tightening knob (6)
clockwise until the light is snug. Alternately, you may mount the light on a tripod or light stand by
screwing the tripod or stand into the ¼-20 threaded socket in the base of the mounting foot.
3. Adjust the light to the desired angle. You may fix this angle by using a coin or screwdriver to
tighten the screw in the angle pivot.
Removing the Light
1. Rotate and loosen the tightening knob (6) by turning it counterclockwise.
2. Remove the light from the camera’s shoe.
Note: If the battery is installed be sure the unit is OFF when mounting or unmounting the unit.
Battery Operation
1. Align the contacts of the battery with the battery contacts inside the battery compartment (1).
Gently slide the battery downward until you hear a slight click. The battery will be locked into
place.
2. To remove the battery, press down on the lock tab at the top of the battery and slide the battery
upward.
Note: For best results, make sure your battery is fully charged.
A/C Operation
1. Connect the DC barrel plug of the power supply to the DC input (8) of the light.
2. Plug the A/C cord of the power supply into an A/C power outlet.