


9
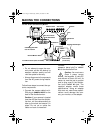
MAKING THE CONNECTIONS
Cat. No. 49-2511 9-Inch Security Monitor
Cautions
:
• Do not attempt to open the cam-
era’s case, as this will destroy its
weather resistant quality and will
void the system's warranty.
• Always disconnect all components
from the AC power during installa-
tion.
Follow these steps to connect the sys-
tem’s components.
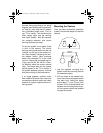
1. Connect the camera cable's mini-
DIN plug to
CAMERA INPUT
on the
back of the distribution box.
Caution:
If your camera is located
less than 65-feet from the distribu-
tion box, coil the cable carefully to
take up the slack and secure it in
place. Do not cut or splice the
cable nor leave it unsecured.
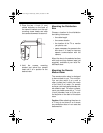
2.
C
onnect the supplied AC
adapter's barrel plug to
12VOLT
DC
on the distribution box.
Caution:
You must use a
Class 2 power source
that supplies 12 volts DC
and delivers at least 400 mA. Its
center tip must be set to positive
and its plug must fit the distribu-
tion box's
12VOLT DC
jack. The
supplied adapter meets these
specifications. Using an adapter
that does not meet these specifi-
cations could damage the cam-
era, your monitor, or the adapter.
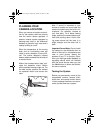
Lens
PIR Sensor
Supplied AC Adapter
Cable Supplied with
Cat. No. 49-2511
Distribution
Box
TALK
Button
Microphone
Remote Motion Alarm
To VCR Controller (RSU 12135851)
Audio IN-Red
Video OUT-Yellow
Audio OUT-White
MIC Talk Indicator
External Alarm
Connections
(not shown)
Camera
VCR Jacks
Camera Jacks
!
Connect
49-2513.fm Page 9 Wednesday, January 19, 2000 4:41 PM