


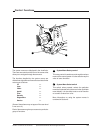


Location of Controls and Functions
Operator's Manual LDK 200 - Multi-role Digital Camera Head
4-5
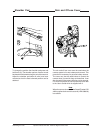
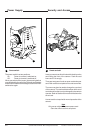
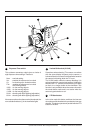
Std Scene File button
The standard scene file button is a momentary button
which, when pressed for two seconds, recalls the
standard scene file video values. These values do not
take effect immediately if the camera is on air; they
take effect when the camera goes off air.
Refer to the Appendix for the default values of the
factory defined standard scene file. Refer to Section 6
to find out how to define and assign a standard
customer scene file.
If the optional Smart-Touch™ feature is installed and
switched on, pressing the Std button for two seconds
displays a list of files in the viewfinder menu. Files are
listed under the Lighting, Creative, and Matching
categories. The standard settings file is also available.
Use the Rotary control and Select switch at the
camera front to recall a file.
Black Stretch switch
This switch when set to the On position, starts the
black stretch function. This function gives more detail
in the dark areas of the picture. Set the switch to Off
to switch off the function. When black stretch is
switched on the non-standard indicator (!) in the
viewfinder lights.
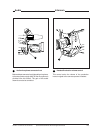
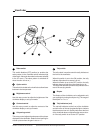
Colour Temperature selector (White Bal.)
This up/down scroll selection switch allows a choice
between three preset colour temperatures:
• 3200K (3.2K) - for studio lighting conditions
• 5600K (5.6K) - for outdoors, clouded conditions
• 7500K (7.5K) - for outdoors, clear blue skies
three memory positions:
• FL- memory position for fluorescent light
• AW1 - memory position 1
• AW2 - memory position 2
and an automatic continuous white position:
• AWC - continuous measurement (2.5K to 20K)
The memory positions can be filled with measured
values using the automatic white balance switch at the
front. Indicators in the 1.5-inch viewfinder light to show
which position is selected. None of these indicators
light when AWC is selected, but the non-standard
indicator (!) lights.
4
5
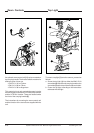
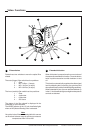
Colour Bars switch (Bars)
The Bars switch turns the colour bar test signal on and
off. The lens iris closes automatically when the colour
bars are switched on.
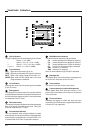
Gain selection switch
This up/down scroll selection switch gives a choice of
five master gain settings. The values for these settings,
except 0 dB, can be set in the Install menu of the
camera systems menu (refer to Section 6). The
indicators in the 1.5-inch viewfinder light as follows:
- Gain is - (-6, -3dB)
+ Gain is + (+6, +9, +12, +18dB)
++ Gain is ++ (+9, +12,+18, +24dB)
+ and ++ Gain is +++ (+30, +36dB)
Note
Reduce crispening (peaking) in the viewfinder when
using the +++ position.
Clean Scan button
When shooting computer monitors with higher frame
frequencies than the camera use the Clean Scan
function to avoid horizontal bars in the picture.
Press the Clean Scan button for two seconds to
directly access the variable exposure (clean scan)
function. Use the rotary control to change the value
and so remove the noise bar. When you are finished
shooting the monitor press the Clean Scan button for
two seconds to switch off the Clean Scan function.
When the Clean Scan function is on, the non-standard
indicator in the viewfinder lights. Refer to Section 5 for
more information on shooting screens.
White Balance switch
This momentary switch is used to start the automatic
white balance process. The camera, when pointed at
a white area in the centre of the picture, measures and
stores a colour temperature setting in the FL, AW1 or
AW2 memory position.
The white balance switch only operates if the colour
temperature is set to the FL, AW1 or AW2 position.
Refer to Section 5 for more information on how to use
the automatic white balance.
Note
Black balance is not necessary with this camera
because of the continuous automatic black control
circuits.
6
7
8
9
3