


65
ENGLISHENGLISH
Advanced Recording
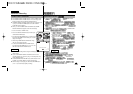
✤ The AUDIO DUBBING function only works in PLAYER Mode.
✤ You can add sound to the original sound on a pre-recorded tape, recorded in
SP mode with 12bit sound.
✤ Use the internal and external microphones or other audio equipment.
✤ The original sound will not be erased.
Dubbing sound
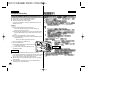
1. Set the camcorder to PLAYER mode.
■
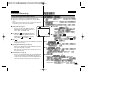
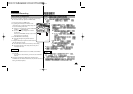
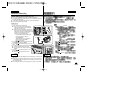
If you want to use an external microphone,
connect the microphone to the external MIC
input jack on the camcorder.
■
When you wish to dub using the External A/V
input, connect the AUDIO/VIDEO cable to the
camcorder by inserting the AUDIO/VIDEO cable
into the AV Jack at the right side of the
camcorder. (VP-D103i/D105i only)
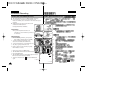
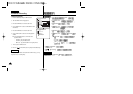
- Press the MENU button, turn the MENU
DIAL to highlight A/V and press
the ENTER button.
- Turn the MENU DIAL to highlight AV
IN/OUT and press the ENTER
button to select AV IN.
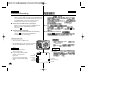
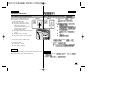
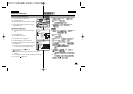
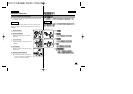
2. Press the (PLAY/STILL) button and find the
timeframe of the scene to be dubbed.
3. Press the (PLAY/STILL) button to pause the
scene.
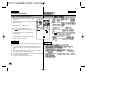
4. Press the A.DUB button on the Remote Control.
■
A.DUB will be displayed on the LCD.
■
The camcorder is in a ready-to-dub state for
dubbing.
5. Press the (PLAY/STILL) button to start
dubbing.
■
Press the (STOP) button to stop the
dubbing.
Notes
■
You can not use the audio dubbing function while playing a write protected
video tape.
■
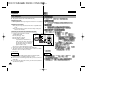
When you wish to dub using the External A/V input, you must connect the
AUDIO/VIDEO cable to the audio system from which you wish to record.
(VP-D103i/D105i only)
■
You can not dub sound on a pre-recorded tape in LP mode or 16 bit mode.
Audio dubbing (VP-D103(i)/D105(i) only)
✤ AUDIO DUBBING
✤ 12 SP
✤
✤
1. PLAYER
■
■
A/V
AV AV
AV
VP-D103i/D105i
MENU MENU
DIAL
A/V ENTER
MENU DIAL
AV IN/OUT A/V IN ENTER
2. PLAY/STILL /
3. PLAY/STILL /
4. A.DUB
■
A.DUB
■
5. PLAY/STILL /
■
STOP
■
■
External A/V A/V AV
/
( VP-D103i/D105i)
■
LP 16bit
Audio dubbing VP-D103(i)/D105(i)
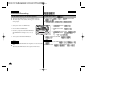
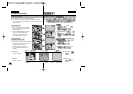
DV
USB
AUDIO
/VIDEO
S-VIDEO
MIC
AV IN
Audio (R)Audio (L)
(VP-D103i/D105i only)