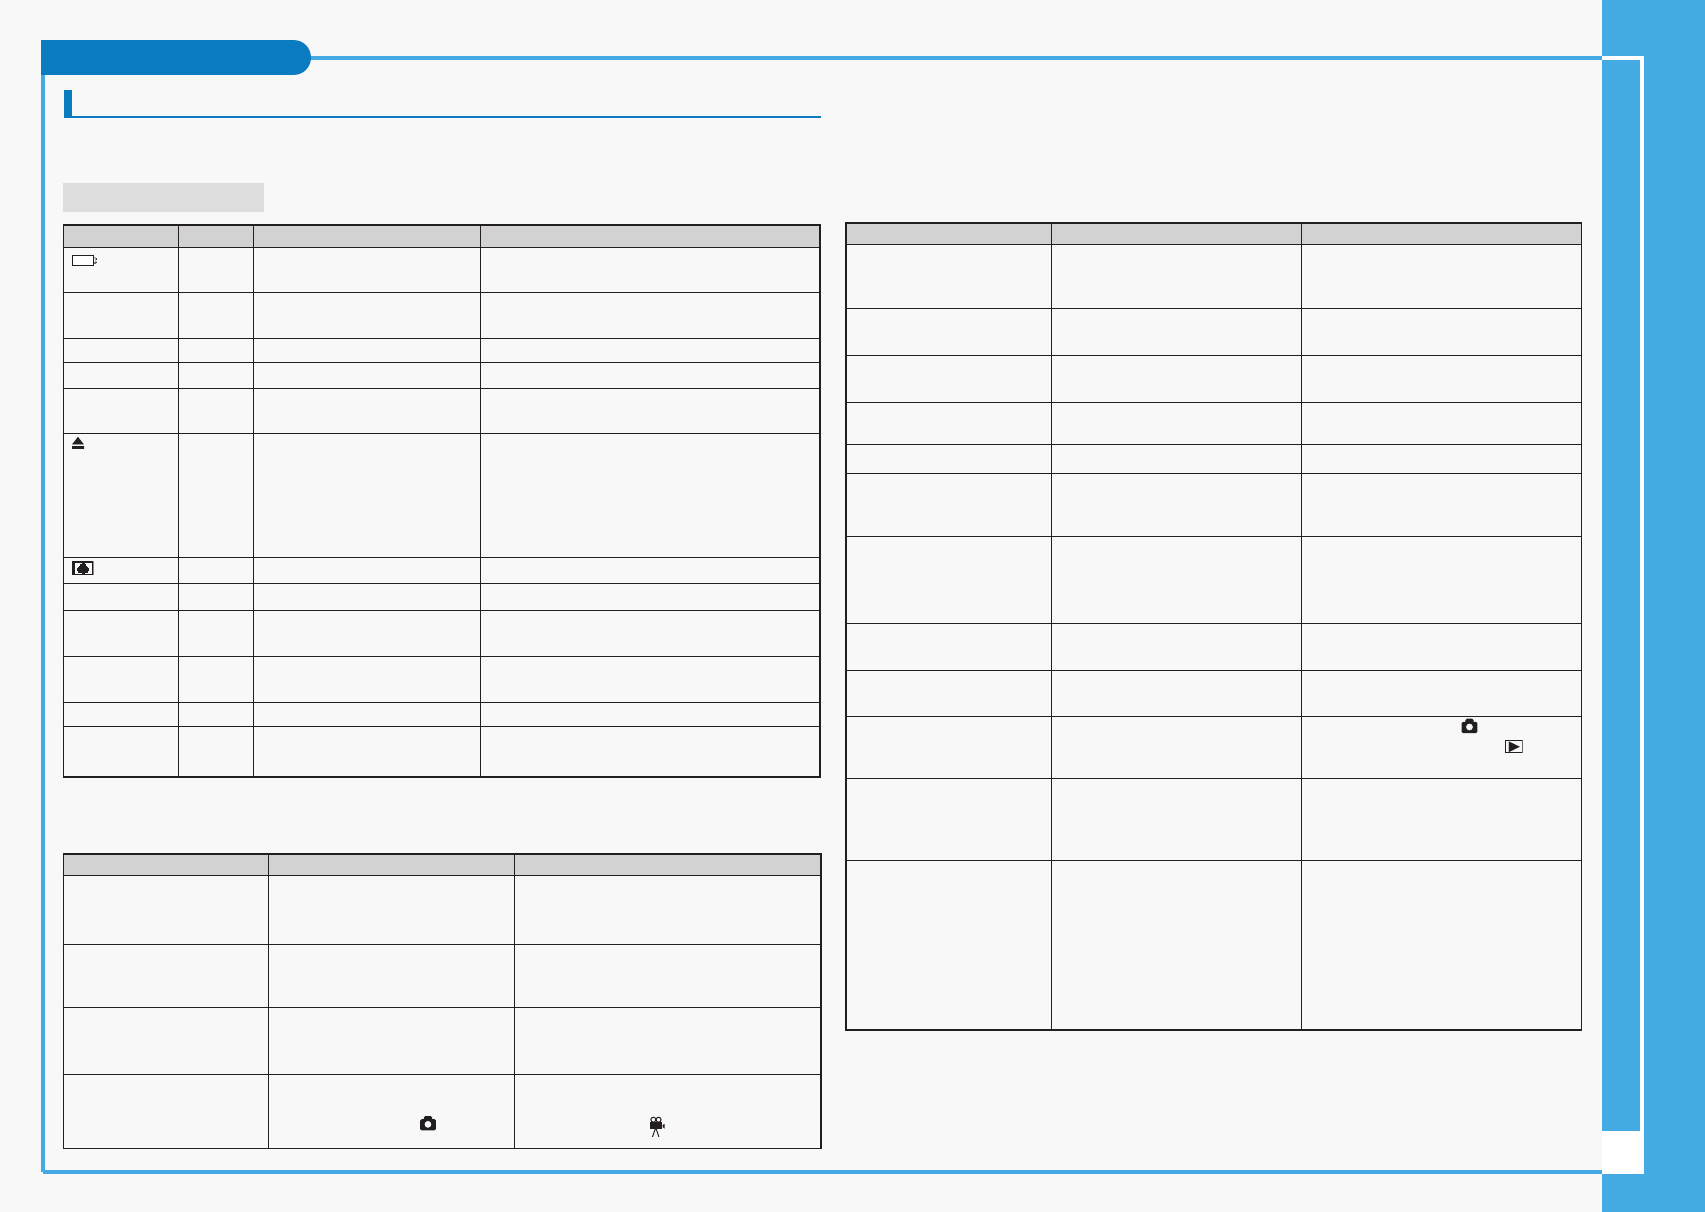
Troubleshooting
✤ If your device fails to function as expected, please check the following before contacting
service personnel. Refer to the page numbers listed for further details.
Self Diagnosis Display
TAPE END!
TAPE END!
TAPE!
PROTECTION!
D,L,C,R
NO CARD!
CARD FULL!
NO IMAGE!
FILE ERROR!
CARD ERROR!
Slow
Slow
No
Slow
Slow
Slow
Slow
Slow
Slow
Slow
Slow
Slow
The battery pack is almost
discharged
When the remaining time on the
tape is less than 2 minutes
Cassette has reached its end
No cassette tape is inserted
The tape is Record Protected
Camcorder has a mechanical fault
Moisture condensation
No memory card is inserted
Not enough space for saving
pictures
There are no images recorded to
play
The image file has an error
Memory card is formatted by other
device or has error in system folder
Display
Blinking
Informs that…
Action
Focus does not adjust
automatically
Cassette tape will not load
properly
The memory card will not load
properly
Colour balance of picture is not
natural
Digital zoom does not work
Files stored in the memory card
cannot be deleted
Images on the LCD monitor
appear dark
Rear of the LCD monitor is hot
Play, rewind and fast
forwarding do not work
Memory card cannot be played
back (Camera mode)
No picture is taken when
PHOTO is fully pressed
Built-in flash will not pop up or
fire
Focus is set to manual mode
Recording was done in a dark place
Lens is covered with condensation
Cassette is in wrong position
The battery is exhausted
Memory card is in wrong position
Something fills in the memory card slot
White balance adjustment is required
Digital special effect is applied
Memory card is protected
File is protected
Ambient is too bright
Ambient temperature is too low
Prolonged use of LCD monitor
Power Switch is set to REC
Power Switch is set to PLAY Mode
Not enough free memory space is
remained
Memory card is formatted by different
devices
Flash is forced to cancel
Focus is set to infinity
AE lock is enabled
Taking the motion clips
Continuous shot option is turned on
Bracket shooting is enabled
Blocking the flash lid
Symptom Possible Causes
Measure
Set focus to AUTO
Use strobe or lit the place
Clear the lens and check the focus
Insert the cassette tape properly, page 47
Charge the battery or use AC adapter
Insert the memory card properly, page 83
Clear the memory card slot
Set proper white balance, page 121
Turn off the digital special effects. page 57
Remove the protection tab of memory card
Remove the protection on the file, page
135
Adjust the brightness and angle of LCD
Low temperatures might produce a dark
LCD display
This is not a malfunction.
Close the LCD monitor to turn if off, or turn
your device off to cool down.
Set the Power Switch to PLAY
Set the Power Switch to (CAMERA)
Mode and set the Mode Dial to (PLAY)
Mode
Delete files from the memory card
Format the memory card
Select different flash mode, page 110
Select AUTO, EASYQ, or different MF
distance, page 112
Turn off the AE lock
Flash is not available for Motion clips
Turn off the continuous shot
Turn off the AEB, page 125
Clear obstructing object
10
Troubleshooting
Change to a charged one or connect to other power
source
Prepare a new cassette
Change to a new cassette
Insert a tape
Change to a new cassette or release the tape
record protection
1. Eject the cassette tape.
2. Set to off
3. Detach the battery.
4. Restart the camcorder
If problem continues, contact your local service
representative.
See page 11
Insert a memory card
Change to a new memory card or delete recorded
images
Record a new still image
Delete the image or format the memory card
Format the memory card using the camera menu
The power is not connected properly
The battery is dead
The battery is too cold
Viewfinder is on.
Multi-AV cable is connected
Display option is turned off
The DATE/TIME is not set
The built-in clock battery has
exhausted.
Protection tab is set to “SAVE”
Power Switch is set to PLAY
Power Switch is set to (CAMERA)
No power is supplied
LCD monitor is blank
DATE/TIME is wrong
Cannot Record a video
Symptom Possible Causes
Measure
Connect the AC adapter properly, page 27
Replace the dead battery pack
Warm up the battery or move to warmer place
Close the viewfinder
Remove the cable
Press the DISPLAY button to bring back OSD
Set the DATE/TIME, page 38
Replace the Li-ion battery for built-in clock,
page 24
Cancel the protection, page 48
Set the Power Switch to REC
Set the Mode Dial to (MOVIE) mode
✤ If these instructions do not solve your problem, contact your nearest Samsung dealer or
authorised service center/personnel.
∞£¥‹º≥∏̺≠ (D6050) 11/19/04 8:42 AM Page 10
