Sanyo Fisher Company
Security Video Division
21605 Plummer Street
Chats
w
or
th,
C
A 91311
T
el:
(818) 998-7322
Fax:
(818) 717-2716
Technical Support: (888) 66SANYO
Printed in USA
100 0009 002 SAN 12/04
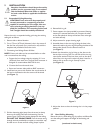
5.2 Hard Ceiling Mounting
Mount the unit in a hard ceiling, e.g. dry wall etc. as follows. Be
sur
e the ceiling will support the weight of the housing and cam-
era.
1.
Cut a 172 mm (6.75-inch) diameter hole in the ceiling. Use
two pencils (or a pencil and a nail) with the template tool
provided to draw the circle.
2. Run electrical cabling to housing and make proper connec-
tions (see Section 4.1 for details on power connections).
3. Install box into pre-cut hole. Position the round section of
the box in the direction that the camera will be aimed (see
Figure 3).
4. Pull the drawstring tight (away from the screw) to clamp
down on the ceiling, then lock the drawstring into the
groove.
DO NOT CUT DRAWSTRING. Push the
excess string through the hole provided.As an option, a
screwdriver may be used to turn screws and lock ceiling
clamps in place.
5. Adjust camera for proper viewing angle.
6. Assemble dome and trim ring as instructed in suspended
ceiling mounting section.
6 CAMERA/LENS SETTINGS
The camera and lens come factory configured and ready
f
or operation. If custom setup is required, refer to the
camera Installation Instructions included in the Instruction
Manual Packet.


