


43
GB
Advanced printing operations
Continued
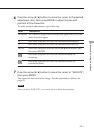
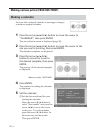
2 Set the day starting the week (placed furthest left in the calendar).
Press the arrow (v/V) button to select “Start day” and press the arrow
(B/b) button to move the cursor to “Sunday” or “Monday”.
Then press ENTER.
Some templates do not have the “Start day” setting.
3 Set the color of days.
Press the arrow (v/V) button to select “Color of day” and press the
arrow (B/b) button to move the cursor to “Sunday in red” or “Sunday
in red/Saturday in blue”. Then press ENTER.
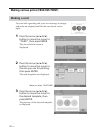
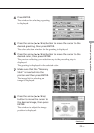
6
Press the arrow (v/V) button to move the cursor to “Next”,
then press ENTER.
The preview of the selected calendar is displayed.
7
Make sure that the “Memory Stick” is inserted into the printer
and then press ENTER.
The image list for selecting an image is displayed.
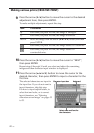
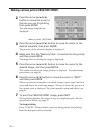
8
Press the arrow (B/b/v/V) button to move the cursor to the
desired image, then press ENTER.
The window to adjust the image position is displayed. For adjustments
procedures, see page 40.
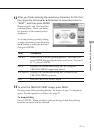
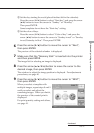
9
Press the arrow (v/V) button to move the cursor to “NEXT”,
then press ENTER.
When you select a template with
multiple images, repeat steps 8 and 9
until you select and adjust the
remaining images. When you finish,
the preview of the created print is
displayed.
For print quantity setting and others,
see page 41.