


70
Connecting to a
PictBridge printer
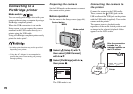
Mode switch: / /
You can easily print images shot with your
camera without using a computer by using a
PictBridge compliant printer.
When the USB connection is set on the
Setup screen, you can connect the camera
mounted in the USB cradle directly to a
printer using the USB cable.
Using a PictBridge compliant printer easily
prints the index print*.
* An index print function may not be provided
depending on a printer.
• Using the AC Adaptor is recommended to
prevent the power from turning off partway
through printing.
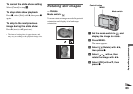
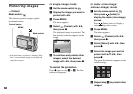
Preparing the camera
Set the USB mode on the camera to connect
the camera with a printer.
Before operation
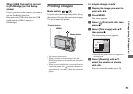
Set the menu to the Setup screen (page 44).
a Select (Setup 2) with V,
then select [USB Connect]
with B/v/V.
b Select [PictBridge] with B/v,
then press z.
The USB mode is set.
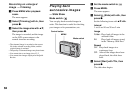
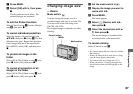
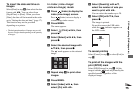
Connecting the camera to
the printer
Connect the camera to the USB cradle.
Then, connect the (USB) jack on the
USB cradle and the USB jack on the printer
with the USB cable (supplied). Turn on the
camera and the printer.
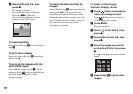
The camera turns to playback mode
regardless of the mode switch position and
an image in the selected playback folder
appears on the LCD screen.
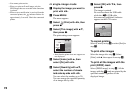
MENU
Control button
Mode switch
2
2
1
Setup 2
Video Out:
Clock Set:
NTSC
File Number:
USB Connect:
PictBridge
Normal
PTP
2/9
101
5M
BACK/NEXT VOLUME
10:30
AM
2004 1 1101-0002
After the connection
is made, the
indicator appears on
the LCD screen.
Printer
Still image printing (PictBridge printer)