


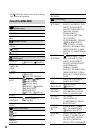

18
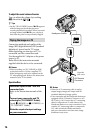
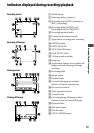
Access lamp
When the Access lamp is lit or ashing,
your camcorder is writing/reading data.
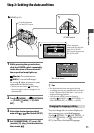
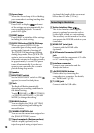
EASY button
Press EASY to display and most
of the settings are set automatically for
easy recording/playback. To cancel,
press EASY again.
RESET button
Press RESET to initialize all the settings
including the clock setting.
QUICK ON button/QUICK ON lamp
When you press QUICK ON, the
camcorder goes to sleep mode (power
saving mode) instead of turning o.
e QUICK ON lamp keeps ashing
during sleep mode. Press QUICK ON
again to start recording next time. Your
camcorder returns to recording standby
in approximately 1 second. e power
turns o automatically if you do not
operate your camcorder for a certain
period during sleep mode.
Speaker
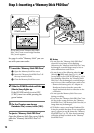
NIGHTSHOT switch
Set the NIGHTSHOT switch to ON (
appears) to record in dark places.
Flash
e ash will ash automatically
depending on recording conditions in
the default setting.
Touch (HOME) (SETTINGS)
[PHOTO SETTINGS] [FLASH
MODE] to change the setting.
MANUAL button
You can display the [DIAL SETTING]
screen with pressing and holding the
manual button.
CAMERA CONTROL dial
You can use the menu item assigned on
the [DIAL SETTING] screen.
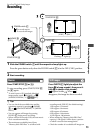
Tripod receptacle (Bottom surface)
Attach a tripod (optional) to the
tripod receptacle using a tripod screw
(optional: the length of the screw must
be less than 5.5 mm (7/32 in.)).
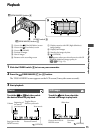
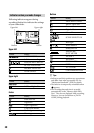
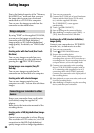
Connecting to the devices
Active Interface Shoe
e Active Interface Shoe supplies
power to optional accessories such as
a video light, a ash, or a microphone.
e accessory can be turned on or o as
you operate the POWER switch on your
camcorder.
HDMI OUT (mini) jack
Connect with the HDMI cable
(optional).
A/V Remote Connector/A/V OUT
jack
Connect with the component A/V cable
or A/V connecting cable.
Interface connector
Connect your camcorder and the
Handycam Station.
(DISC BURN) button
Create a disc by connecting the
camcorder to a computer. For details,
see “PMB Guide” (p. 28).
(USB) jack
Connect with the USB cable.