


Connect the Camera to the Router / Turn on the Power of the Camera
3
• Adobe, Acrobat and Acrobat Reader are trademarks of Adobe
Systems Incorporated in the United States and/or other
countries.
• All other company and product names are trademarks or
registered trademarks of the respective companies or their
respective makers.
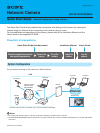
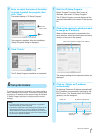
3 Connect the Camera to the Router
To make the network setting on the camera, connect the
camera to the router using a commercially available
network cable. The setting of the camera should be
performed using the computer connected to the router.
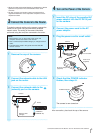
1
Remove the cap of the camera.
2
Connect the network cable to the LAN
jack on the router.
3
Connect the network cable to the
(network) port on the camera.
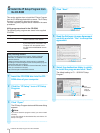
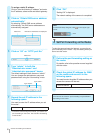
4 Turn on the Power of the Camera
1
Insert the DC plug of the supplied AC
power adaptor into the DC IN 5V jack
on the camera.
2
Connect the power cord to the AC
power adaptor.
3
Plug the power cord to a wall outlet.
4
Check that the POWER indicator
flashes, then stays lit.
The camera is now turned on.
After connection, place back the cap of the camera.
Notes
• Before setting, turn on the power of the router and
computer and connect them to the Internet.
• Use a commercially available category 5, straight network
cable.
• The illustrations used in this guide show the SNC-M1
network camera.
5m
!
Network cable
(straight)
Camera
to
to LAN
(10BASE-T/
100BASE-TX)
Router
5m
!
Camera
Power cord
(supplied)
AC power adaptor
(supplied)
1 to DC IN 5V
2 to a wall outlet
3 to the adaptor
POWER indicator