


1.Start the DVR4Net - Plus
2.Turn off the DVR4Net - Plus
System Setup.
Record Stop
System Setup
3.Normal Recording
Display
Overwrite
Record
Record
Record Stop
4.Alarm Recording
Schedule
Schedule Mode A Record Schedule .
Alarm Setup
ON . Motion Alarm ON
After starting the DVR, please ensure the DVR's input video (NTSC/PAL) and your TV/Monitor
(NTSC/PAL) are both set to the same standard. NTSC for USA & Canada, PAL for Australia, UK and
most of Europe.
Fit the hard drive to the removable caddy and insert the removable caddy into the housing, then
lock it up (turn the hard disk lock to the right) and connect the power which will then boot the DVR
and it will start to work.
Only turn off the DVR when the system is inactive. Do not to turn off the DVR while playing or
doing the Turning off the DVR while recording may cause the recording to corrupt,
and can cause the HDD to be unreadable in some cases.
Push the button to stop recording or push button to stop playing or exit from
menu, then turn off the power.
If do not wish use the DVR for a long time, you should remove the power cord from the electrical
outlet and store the unit where it will not be damaged.
Connect the power to all related equipment; ensure that there is video input using direct connection
to your TV or VCR.
Push the button to check spare space of the hard disk, if there is not much space,
please consider changing your hard disk first or select mode.
Check recording parameter setup before recording; select video quality, frame rate.
Note that you cannot change record setting during the process of recording.
Manual recordings are the normal recording condition. Under the manual mode
(non-schedule status), pushing the button will record all channel’s video.
Push the button to begin recording, four channels will start simultaneous recording.
While in normal recording mode, push the or button, and enter the right password, to
stop recording.
During the process of recording if the hard disk is full and the system is set to automatic
overwrite, the recording will not be interrupted but the DVR will automatically begin to overwrite
recorded video from the earliest (oldest) recorded area. If the system is set to overwrite disabled, it
will stop recording once the HDD is full.
Alarm recording is not started by manually pushing the Record button, it is automatically activated
once mode is enabled.
Alarm recording can be activated by alarm input signal or motion, if the connection of alarm input
equipment is correct, stable and reliable, and the alarm settings are correct.
For recording to be activated by exterior input signal or motion detection the system must be set to
active and that period is set to “ ” in setup You must also set the
menu of for exterior input alarm, and the alarm enable setting of that channel must be
set to “ ” For , the motion enable setting of that channel must set “ ”, and set
the area for motion detection must be set.
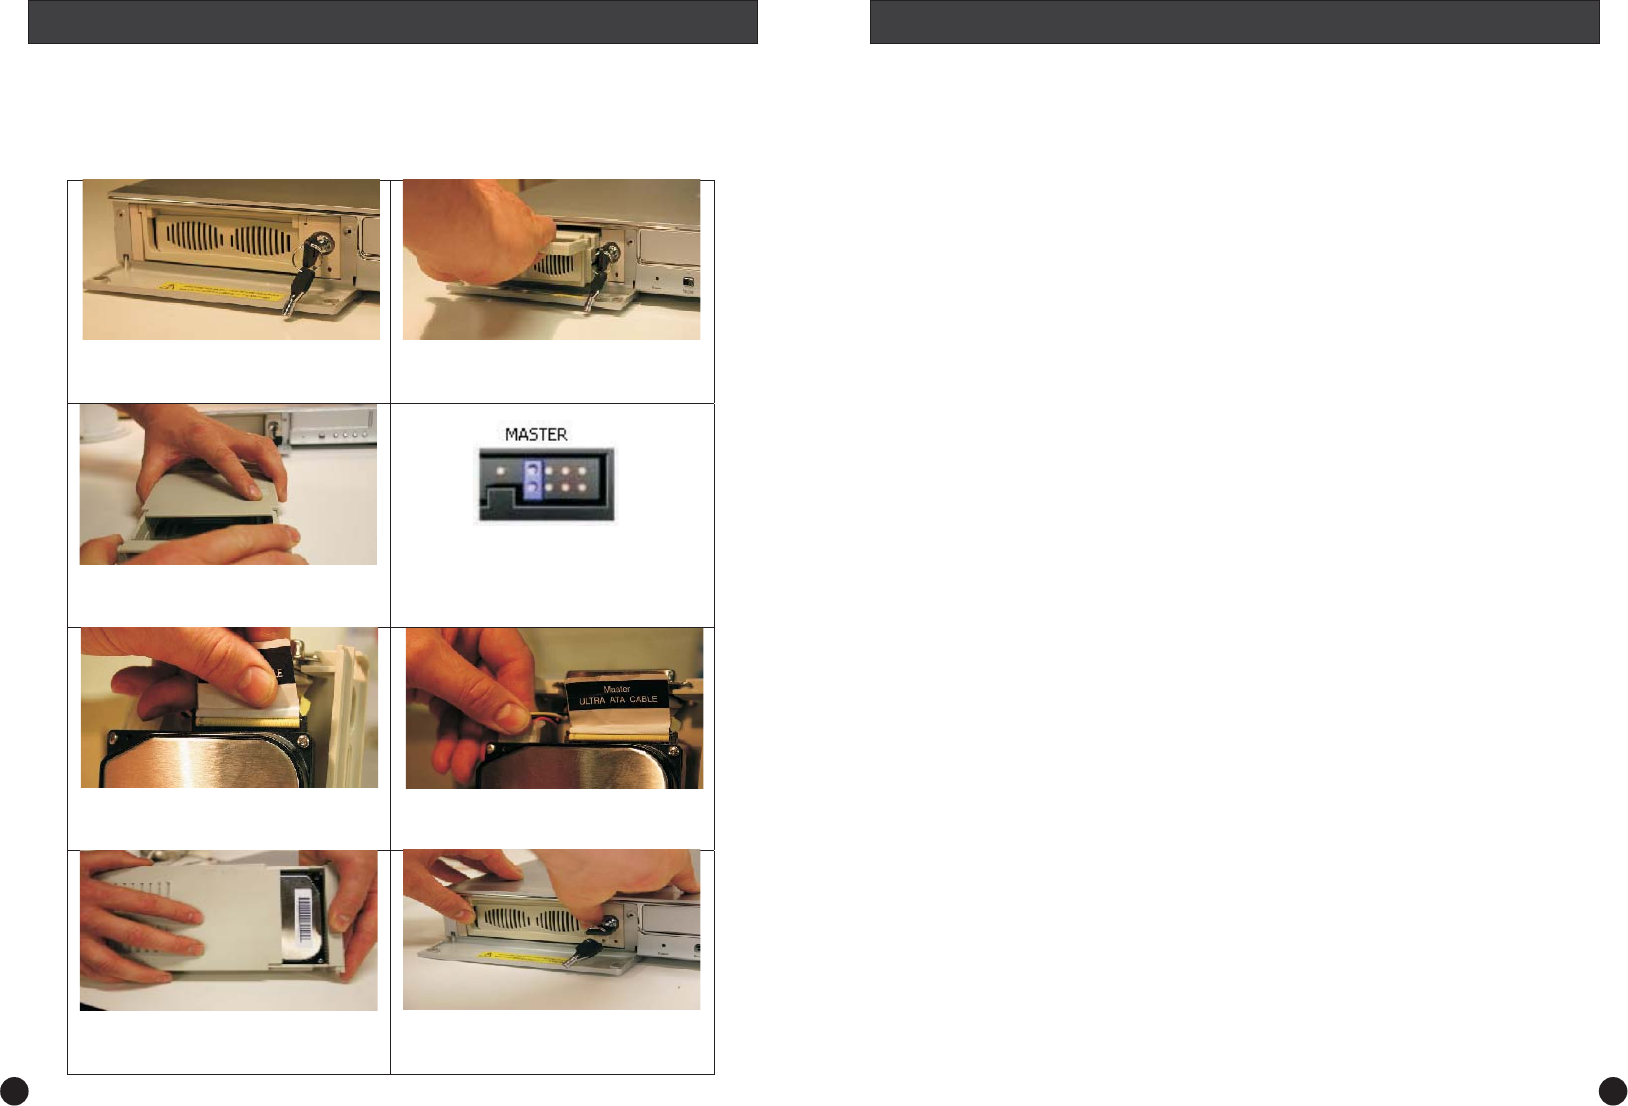
Please note: For instructions on how to jumper your hard disk drive (HDD) to “master”, please
refer to the information found on the label on top of the hard drive or visit the hard disk drive
manufacturers website.
Also note that the key must be in the locked position for the hard disk drive to work. If the key is
left in the unlocked position the power to the hard drive is switched off.
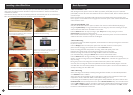
Open the cover of the hard disk enclosure and
unlock it using the supplied key. When unlocked
the key will be vertical as shown.
Carefully lift the handle on the front of the caddy
and remove it from the housing.
Connect the power connector to the power
socket on your hard drive. The connector fits
with the cut off corners at the top.
Replace the caddy into the housing pushing on
both sides to ensure a solid connection, then turn
the key to the horizontal position to lock it.
Place your hard drive in the caddy and then
connect the data cable to the socket on your hard
drive.
Slide the top cover of the caddy towards the end
with the handle to replace it.
Slide the top cover of the caddy towards the back
(the end with the connector) and remove it.
Prepare your hard drive by setting the jumper to
Master. Check the label of the hard drive for
information on how to do this.
Installing a Hard Disk Drive Basic Operation
36