


121212
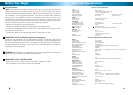
Using the SoftwareSettings
Date / Time
Here you can update the date and time settings in the receiver to the correct
values. The receiver will retain date and time information if turned off and on
again, or if power is disconnected for a short time.
Note: The date is formatted as YYYY / MM / DD
Brightness
Alter the brightness of the image displayed. There are fi ve levels you can choose
from, with 0 being the darkest and 5 being the brightest. Note that this setting
won’t help if you’re looking into an area without suffi cient illumination which is
outside the range of the night vision.
Volume
Adjust the output volume from the receiver. Again, this will not affect the recorded
volume or allow the microphone in the camera to pick up sounds too soft for it to
‘hear’. We suggest leaving the volume here at it’s default setting, and changing the
volume on your TV/monitor.
Scan Time
When Auto-Switching mode is activated, the Scan Time will adjust how long it
will dwell on a channel before automatically switching to the next. This can be set
between 3 and 10 seconds.
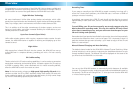
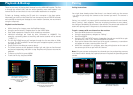
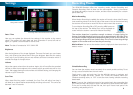
The Main Menu with the
Settings Menu selected.
The Settings Menu with the Date/Time selected.
9
Recording Modes
The ADW-400 Receiver offers two recording modes, Motion Recording and
Schedule Recording. Both of these can be used together - that is, the receiver
can always be ready to record on motion, and also record constantly for a certain
period each day.
Motion Recording
When Motion Recording is enabled, the receiver will record a short video fi le every
time something moves in the line of sight of the camera. You can choose how long
the receiver will continue to record for after a motion event has occurred.
Schedule Recording
You can have the receiver record constantly for a certain period each day. To set
this up, access Schedule from the main menu.
Simply enter a start and end time. Use the left/right arrows to navigate, and
up/down to change the values. Choose “On” to exit the schedule menu with
Schedule recording active, or “Off” to exit the menu leaving schedule recording
deactivated.
Note: If you set the schedule to record a long period each day, remember that
you’ll need to have a very large SD card in the receiver to store all that video data!
If the card is smaller than the total fi le size, then you’ll lose at least part of the
recording, and possibly all of it.
The motion detection is sensitive enough to detect a human being (or
human sized object/animal) moving at up to approximately 26ft (8m) from
the camera. Smaller objects/animals proportionally closer to the camera, as
well as larger things which are farther away. The criteria is how large things
appear on the screen and how fast they are moving.
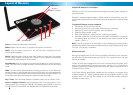
Motion Alarm: You can set the receiver to emit a high-pitch alarm tone when it
detects motion.
To turn Motion Recording ON or OFF, press the ARM button on
the top of the receiver. The Motion Icon will be displayed on
screen whilst the receiver is armed for Motion Recording.
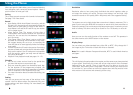
The Motion
Detection icon.
The Schedule menu.