


1-8 User's Guide LDK 4482 - SuperXpander 02.38.3
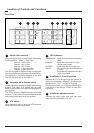
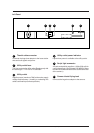
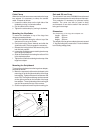
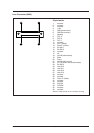
Adjustment
screws
NOTE:
Due to tolerances it is possible
that the lens cannot be secured.
Therefore there are two knurled
screws on top of the Electronic
Unit with which the Camera
attachment block can be adjusted.
Turn the screws clockwise to raise
the block and turn
counterclockwise to lower the
block.
Camera
attachment
block
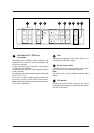
2
Adjustment
screws
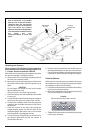
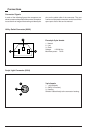
Attaching the Camera
When using an LDK10P/00 or 01 before attaching
the camera remove from the handgrip items 19, 6,
7, 14 and 5. See Service Manual LDK10P.
Attach the camera to the large lens adapter only after
the lens is mounted. Proceed as follows:
a. Remove the 1.5 inch viewfinder support bracket at
the front of the camera handle.
b. Mount the bayonet ring locking lever to the front of
the camera and ensure that the bayonet ring is
open.
CAUTION
Do not tighten the screw to much as this could
deform the bayonet-ring.
Check that lever can close ring smoothly.
c. Place the camera onto the footbed but do not slide
it home yet.
d. Connect the lens cable from the large lens adapter
to the lens connector at the side of the camera.
e. Connect the viewfinder cable from the large lens
adapter to the viewfinder connector at the side of
the camera.
f. Push the camera all the way home along the
wedge-shaped groove so that the stud on the
footbed engages the bottom rear of the camera
and the bayonet ring engages the lens.
g. Turn the bayonet ring locking lever on the front of
the camera downwards so that the camera is
connected to the lens.
h. Plug the flying triax lead from the left side panel of
the large lens adapter into the rear of the camera.
i. Connect the triax cable from the base station to the
connector on the left side of the large lens adapter.
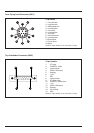
Camera Balance
When the lens and camera are mounted on the large
lens adapter it may be necessary to balance the large
lens adapter on the tripod as follows:
a. Loosen the balance knob on the side of the footbed
by turning it counterclockwise.
b. Move the footbed back and forth along the tripod
until the best balance is achieved.
Caution
Ensure that the ribs mesh correctly
c. Tighten the balance knob on the side of the footbed
by turning it clockwise.