


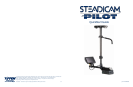

8
9
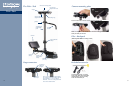
Vest&Arm
Putting on the vest
The vest should be tight and not slip on your body. The front spar should be vertical.
The vest should be long enough to engage your hip bones, but not so long that you
can’t lift your leg without disturbing the vest.
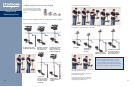
Setting the arm’s lift
You must be carrying the sled to adjust the
arm lift. Adjust the lift with the arm angled
slightly up — the knob will turn easily.
Set the top screw and just barely tighten
the bottom screw.
The two screws work in tandem. To make
further adjustments, you must loosen
one in order to tighten the other. Don’t
overtighten these screws!
Adjust these screws again after you pick
up the Steadicam.
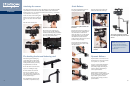
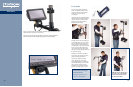
Adjusting the arm
You’ve adjusted the balance of the sled,
and put on your vest, now you need to
adjust the arm to carry the load.
Insert the arm into the socket block fully
as shown.
This is how you want to look wearing
the Steadicam Pilot — natural and
relaxed, with your hips turned slightly
towards the sled. Note that the sled
is not at your side, but more at a 45°
angle to your hips.
Adjust the forearm (the section nearest
the sled) first, then the “upper arm”
section.
With everything adjusted properly and
with a natural stance, the rig should
“float” next to you. A gentle touch with
your left hand just below the gimbal
guides the camera, while the right hand
booms and places the whole sled in place.
Each arm section should settle to a slightly
upward angle as shown in the photos.
Stand naturally and boom all the way up and down. Both arm sections should
track together. Do not bend over or lean back as you boom up and down.
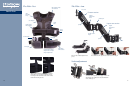
Making it float If the rig won’t float next to
you, you must adjust your
posture and/or adjust the
angle of the arm:
If the rig is falling away from you,
tighten the upper “Tee” head screw.
If the rig wants to come too close,
loosen the upper screw.
If the rig falls to your right, screw
the top side to side adjustment
in. If it falls left, turn the top side
to side adjustment to show more
threads.
Be careful to maintain a good and
consistent posture while making
these adjustments, or you will be
fine tuning all day...
Use the two “Tee” headed screws to set
the “in and out” angle of the arm. Start
with the upper screw almost all the way
in if you look like Michael (above). If
you have a big belly, start with the upper
screw further out.
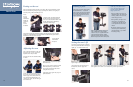
To use
the vest,
open the
left shoulder
buckle, put
on the vest,
and re-
connect
the buckle.
Attach the right chest belt with female
buckle across the chest plate and con-
nect it to the left chest belt with the male
buckle. Then tighten up the belts by
adjusting the belt’s length.
Connect the left and right waist belts together and adjust the belts to the desirable
length for a comfortable fit. Be sure the left belt lies within the belt guide which is
attached to the left side of the waist pad.
Use the optional
extension belt
if required.