


14
Various settings can be controlled on the unit by using the on screen menu displayed on the monitor. The
contents once set are memorized in the scene files (A, B, C, D, E) selected, so if the power turns off, it is
unnecessary to set the values again when using the unit next time. When the setting is performed, select
the menu of the item to be set.
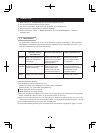
7 MODE SETTING BY THE ON SCREEN DISPLAY
7 1 Using the Menus
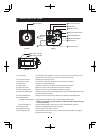
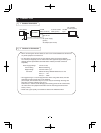
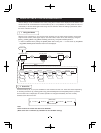
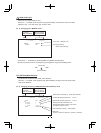
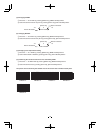
When the unit is powered on, the normal screen showing only the video signal appears. Change the
output to each screen (video signal output, color bar screen, index menu, and menus) by using the
[DISP], [PAGE], [MENU UP], [MENU DOWN], [DATA UP], and [DATA DOWN] buttons.
* A menu is selected when pushing the [PAGE] button after moving the “㸢” on the screen by the [MENU
UP], [MENU DOWN] button while the Index menu is displayed.
POWER ON
Video signal output
DISP
PAGE
PAGE
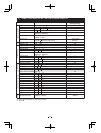
1.SHUTTER 2.GAIN 3.WHT BAL 4.PROCESS 5.MATRIX 6.OPTION
Color bar screen
Menus
Index menu
DISP DISP
PAGE
PAGE PAGE PAGE
PAGE PAGE
MANUAL
OFF
NOAWB
OFFATW
MANUAL
GAMMA
ON
GAMMA
OFF
AUTO
MANUAL
SS
PAGE
DISP
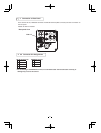
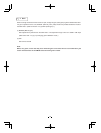
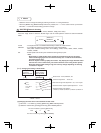
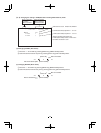
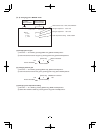
7 2 Scene File
䌛DATA UP䌝
FILE A ޓޓFILE B ޓޓFILE C ޓޓFILE D ޓޓFILE E
䌛DATA DOWN䌝
Five scene files (A, B, C, D, E) are available as user memories for this unit. These are chosen depending
on shooting conditions. By pressing [DATA UP], [DATA DOWN] buttons while [DISP] button is pressed
and the index menu is displayed, the camera operation is changed immediately from the currently
selected scene file to the next.
Note:
Scene file does not contain the data of set "OPTION."
(Refer to the item "7.3 Menus" (6) "OPTION" for the "OPTION" setting.)