


Install the Base
The following tools are required:
• Electric Drill
• 5mm Drill Bit
• No. 2 Philips Screwdriver
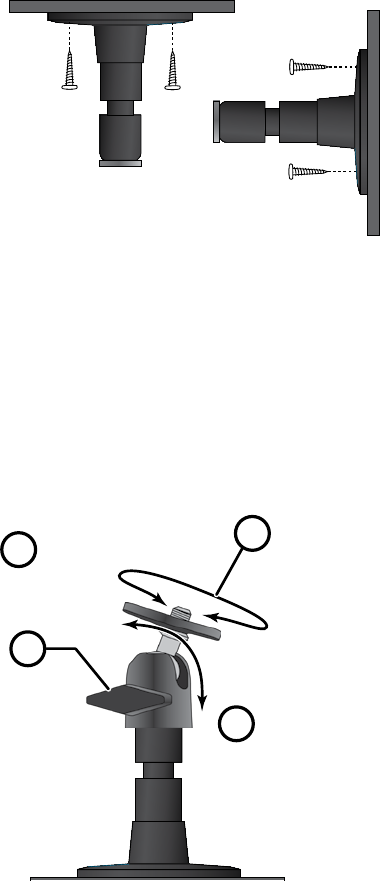
1. Hold the base of the camera stand where you want to mount it and mark the
location of the screw holes.
2. Use the included screws and anchors to attach the base to the wall or ceiling.
You can also screw the base into a flat surface such as a tabletop if needed.
3. Before attaching the camera, tug gently on the stand to make sure it is
securely in place.
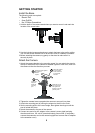
Attach the Camera
1. Attach the camera bracket to the mounting screw. You can attach the stand to
the top or the bottom of the camera as needed.Tighten it a few turns, then turn
the camera to face the direction you want.
2. Tighten the camera brace up against the camera to secure it into place.
3. Unlock the mounting post by turning the wingnut to the left a few turns.
4. Set the mounting post to the correct angle, then tighten the wingnut until the
post is locked into place.
5. Attach the antenna to the rear of the camera.
6. Connect one end of an AC adapter to the camera’s power pigtail and plug
the other end into a 120 volt AC (standard indoor) power outlet. (If necessary,
connect the extension cord to the camera’s pigtail and connect the AC adapter
to the extension cord.)
1
2
4
3
Loosen the
wingnut to
unlock the
mounting
post.
Attach the camera
to the mounting
screw and turn it
to the desired
direction.
Adjust the post to
the correct angle,
then tighten the
wingnut to lock the
post into place.
Tighten the brace against
the camera to
secure it
in place.