


48 VISIONEER MX 200 DIGITAL CAMERA USER’S GUIDE
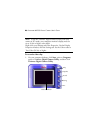
To take a snapshot:
1. Open the Visioneer Digital Camera Utility.
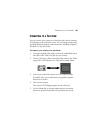
2. Click the Snapshot button to take a picture of the view in the
Video Viewfinder.
3. On the Save Picture to File dialog box, enter a file name, select
a destination, and select a file format (JPEG, BMP, or TIF) for
the picture.
4. Click Save on the dialog box to save the snapshot.
5. When finished, click Exit to close the Visioneer Digital
Camera Utility and then turn off your camera.
6. To view the snapshot, locate the file in the destination folder
in which it was saved.
7. Double-click the file to open and view the snapshot.
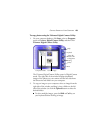
To change video parameter settings:
1. Open the Visioneer Digital Camera Utility.
2. Click the Setting button and choose either Video Format or
Video Source to open dialog boxes to adjust video settings.
On the dialog boxes, you can adjust video options such
brightness, frame rate, and output size.
3. When finished, click OK on the dialog box, click Exit to close
the Visioneer Digital Camera Utility, and then turn off your
camera.