


5
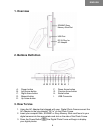
Transfer Digital Photos from your PC to the Digital Photo Frame
You can transfer digital photos directly to the photo frame from your computer.
Connect the wide end of the USB cable enclosed with your Digital Photo Frame to
your Windows ME, 2000 or XP computer’s USB slot.
1. Plug in the Digital Picture Frame and press power to turn it on.
2. Connect the narrow end of the USB cable to your Digital Photo Frame. The
computer will automatically recognize your Digital Photo Frame.
3. Using Windows Explorer open the disk drive by either double clicking on My
Computer, or if you are using Windows XP, clicking on the Start Button and
choosing My Computer from the menu. Once the My Computer window opens,
there will be 3 drives that appear. The first drive is for the Internal Memory on
your Digital Photo Frame. The second drive is for SD/MMC card. The third is
for Sony Memory Stick card. Please make sure that if you want to transfer
digital photos to a memory card that the card is properly installed in the Digital
Photo Frame.
4. Open the folder that contains the digital photos you want to transfer. This
folder is typically called “My Pictures” Select the digital photos to transfer and
drag and drop them onto the disc drive in Windows Explorer.
5. Disconnect the USB cable from your Digital Photo Frame and the new digital
photos you have transferred will begin to display.
4 Customize
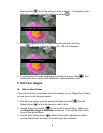
1. Your Digital Photo Frame comes to you in Auto-Slideshow mode. The default
setting for the slideshow is a 3 second interval between digital photos. You
can choose three other intervals between digital photos in Auto-Slideshow
mode. Press the Circular Arrow button
to toggle through the selection of
3, 6, 15 or 60 second intervals. Your setting selection will appear on the
display.
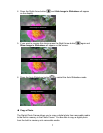
2. To display a single image or to manually step through your digital photos,
press the Manual button . In Manual display mode you can press the
Six Second Dela
y