16
En
2 Library
Displays the iTunes library.
! To display the iTunes library, change the settings at the [SETUP]
menu.
= Show iTunes Library (p.31)
3 Crates
ITCH uses digital crates for quick access to your favorite collections.
There is no limit to the number of crates you can create, and any
given track can be placed in multiple crates. The crate area is on the
left hand side of the library.
4 Subcrates
Crates can be placed within other crates. These crates are called
“Subcrates”.
5 (brown)
Click this to create a new crate.
! When a crate is dragged and dropped into another crate, it
becomes a subcrate. Repeat this operation to increase the num-
ber of layers.
! When one or multiple tracks is/are dragged to
(brown), a
crate including this/these tracks can be created.
! If there are multiple layers, the layer below can be opened or
closed by clicking on the respective item.
6 (blue)
When this is clicked, a “smart crate” can be created. A smart crate is
one in which only tracks meeting preset conditions can be collected.
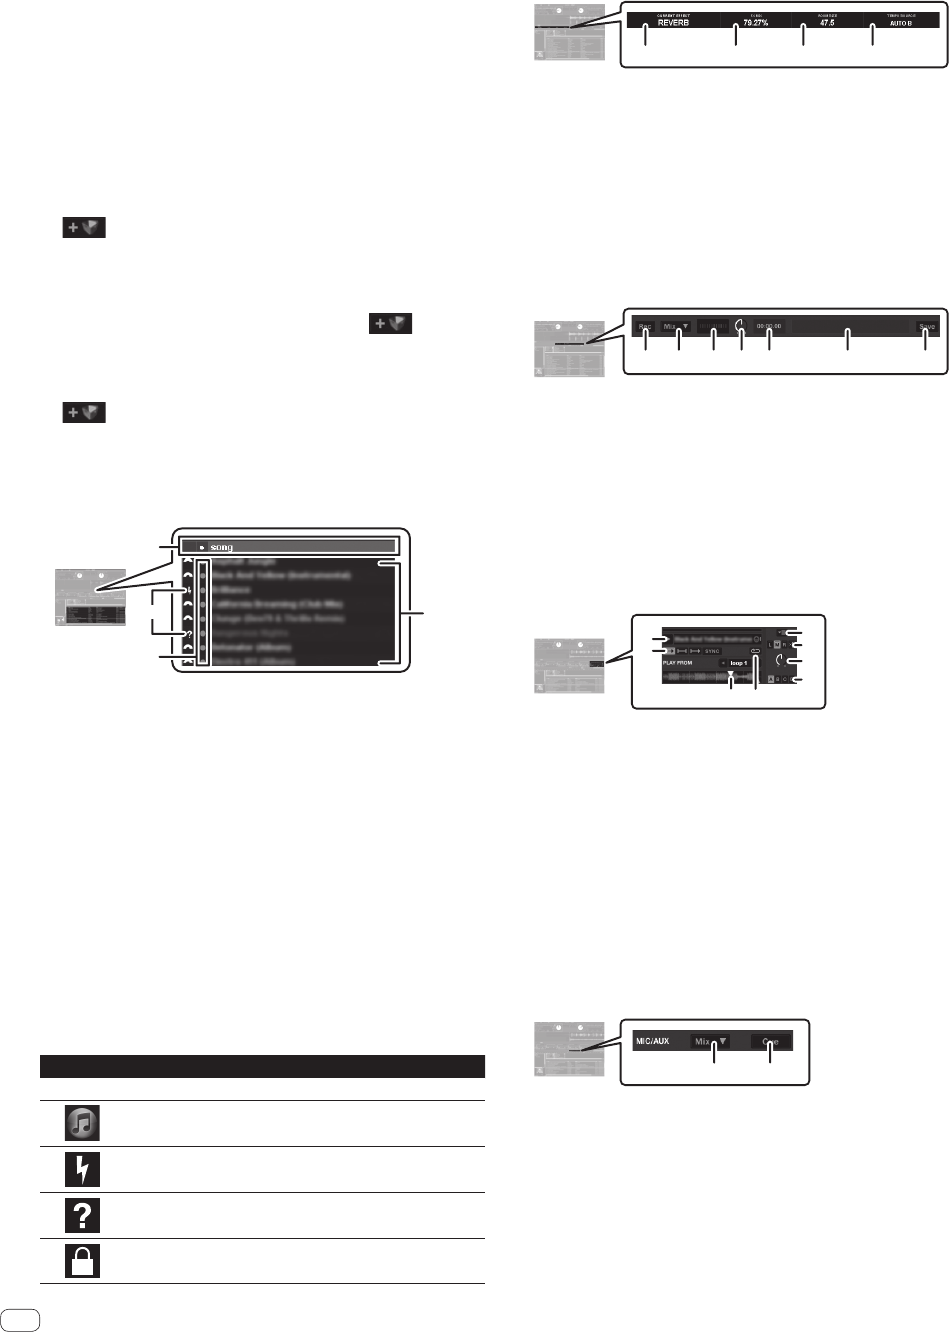
Track list
4
1
2
3
1 Column header
The selected item name is displayed here. When the item name is
clicked, the order of display can be changed (sorted).
The items below can be displayed in the area in which the track
information is displayed.
Date added (date added to library), album, artist, bitrate, BPM, com-
ment, composer, filename, genre, group, key, label, track time, place
stored, remixer, sampling rate, file size, track, video track, year
! The order of the tracks in the track list is indicated by the num-
bers displayed in the “#” column.
2 Track
Displays the tracks included in the item selected at the crate list
panel.
3 Color label
Colors can be set to differentiate the tracks.
4 Status icon
The status of tracks are indicated by icons.
Icon Meaning
None Tracks that have been directly imported into the ITCH library.
Tracks imported from an iTunes library.
Tracks whose files are damaged. Such tracks must be re-encoded.
Displayed when the file cannot be found in its original position.
Indicates read-only tracks that cannot be edited.
Effect panel
This is displayed when [DJ-FX] on the multiple console is clicked.
1234
1 The name of the selected effect is displayed.
2 Displays the value adjusted with the [LEVEL/DEPTH] control.
3 Displays the value adjusted with the [PARAMETER] control.
4 When the BPM is not set manually using the [TAP] button, [AUTO
A] or [AUTO B] is displayed and the sound is synchronized to the
BPM set on the deck. When the BPM has been adjusted manually
using the [TAP] button, [MAN: xxx.xx] and the current BPM are
displayed.
Recording panel
This is displayed when [Record] on the multiple console is clicked.
12345 76
1 Click this to start/stop recording.
2 Click this to select the source to be recorded.
3 This displays the sound level input from the source being recorded.
4 This adjusts the recording level.
5 This displays the elapsed recording time.
6 Input the name of the recorded data file here.
7 Click this to save the recorded data.
Sample player window
This is displayed when [SP-6] on the multiple console is clicked.
= Using sample players (p.26)
1
5
6
7
8
2
3
4
1 Use these to play the track loaded in the corresponding sample slot.
2 Use these to switch the playing mode.
3 This displays the beat position.
4 When this is clicked, the track returns to the beginning once the end
is reached.
5 Use this to select the displayed items.
6 The output channel for the overall sample slots can be set.
— [L]: Sets the output channel to channel [A].
— [M]: The sample sound is output from the [MASTER] channel.
— [R]: Sets the output channel to channel [B].
— [Mute]: No sound is output.
7 This sets the overall sampler slot volume.
8 These switch the sample bank.
MIC/AUX monitor control panel
12
1 Click this to select the output channel for the connected microphone
and external device. This setting only affects the [MASTER] channel.
— [MIX]: Outputs regardless of the position of the crossfader.
— [X-F A]: Outputs when the crossfader is to left of the right edge.
— [X-F B]: Outputs when the crossfader is to right of the left edge.
— [Mute]: Sound is not output.
2 Click this to monitor over the headphones. While the key is high-
lighted, the sound of the connected microphone and external device
is output to the headphones [CUE] channel.
