


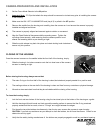

Of the Latches:
The two latches of the AQUATICA Pro Digital housing are designed to have a locking action to prevent accidental
opening. Always ensure that the locking mechanism is secure. Watch for the build-up of corrosion or salt residue around
the latches. This will appear as a white material. Lubricate the latches with a small amount of WD-40 to remove the
corrosion or salt residue build-up.
Of the O-Rings:
The O-rings that need to be maintained on a regular basis are the main housing O-ring and the O-ring on the lens port.
The main O-ring should be cleaned on a daily basis and the port O-ring should be cleaned daily or each time the
port is changed.
Of the sacrificial anodes:
The three anodes attached to the bottom parts of the housing are there to prevent corrosion due to electrolysis, as time
goes they will deteriorates and need replacement, contact Aquatica for replacement and procedure of their installation.
TO SERVICE O-RINGS
ON THE HOUSING MAIN O-RING, PORTS AND EXTENSION RINGS
1. Remove the O-ring. It is important never to use a sharp instrument when removing an O-ring as this may
damage the O-ring groove or the O-ring itself. A bobby pin or edge of a credit card works well.
2. Once the O-ring is removed, it should be examined for damage. Check to make sure that the O-ring is free of
nicks and cuts and that it retains its original round profile. O-rings that appear to be damaged should be discarded
immediately and replaced with new O-rings.
3. Rinse the O-ring with fresh water and dry it with a clean lint free cloth.
4. Clean the O-ring groove (where the O-ring sits) with a Q-tip. Be sure to remove any lint the Q-tip may leave
behind. Inspect the groove for damage.
5. Wipe the part of the housing that the O-ring seals against with a clean lint-free cloth.
6. Re-grease the O-ring with a thin layer of O-ring grease until it appears to be smooth and shiny. Do not over
grease it. Use just enough grease so the O-ring will pull smoothly through your fingers. Excessive amounts of
grease will only serve to attract dirt to the o-ring.
7. Make sure that the O-ring is properly (envenly) installed in the O-ring groove.
8. To reinstall the clean and lubricated O-ring, place the entire O-ring over the groove and start by pushing the
O-ring in at each corner then, push the O-ring at each side and finally, work in the rest of the O-ring. Never
start at one end and work your way around the O-ring. This places uneven tension on the O-ring which may
cause the O-ring to stretch resulting in excess O-ring, which will have no place to go.
There are internal O-rings on the housing controls as well. These O-rings are not as susceptible
to damage as they are not exposed but they do require yearly maintenance and are not user serv-
iceable. The housing should be returned to AQUATICA or to an authorized AQUATICA service facili-
ty for this annual maintenance. Check the Web site www.aquatic.ca for the closest service center.
An internal moisture alarm is available for your AQUATICA Pro Digital housing (Product # 18796). This
alarm is available through your authorized AQUATICA dealer and can be easily installed.
Page 13 of 14