


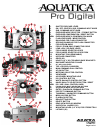

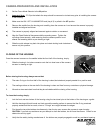

20. METERING SELECTOR CONTROL : Push and rotate clockwise or counter clocwise to select the metering mode, Spot,
Center-Weighted or Matrix metering options.
21. AF-ON BUTTON : Press to activate autofocus, refer to camera manual for a description of the different options.
22. VIEWFINDER : A full view of the illuminated camera viewfinder displays all necessary information.
23. MOUNTING HOLES FOR ACCESSORIES : Two 1/4"-20 TPI holes are supplied to accept TLC accessories.
24. ISO CONTROL BUTTON : Press to select ISO, use in conjunction with Main Command control knob (# 19).
25. WHITE BALANCE : Press to access white balance functions, use in conjunction with Main Command knob (# 19) and
subcommand dial control (# 2).
26. IMAGE QUALITY SELECTOR CONTROL : Press to access the different image quality available on the camera, use in
conjunction with Main Command knob (# 19) and subcommand dial control (# 2).
NEW. ISO / QUAL / WB CONTROL KNOB: Lift knob and position over setting to be modified, see description
of 24, 25 and 26 for more info on individual setting mode. when done lift knob and position in neutral
position.
27. FOCUS AREA / MULTI SELECTOR BUTTONS : These buttons have multiple uses. they allow the selection of the focus
area, in the menu mode, they are used to scroll up or down and left to right to choose from your menu selection and they
are used in the delete mode.
28. AUTOFOCUS MODE SELECTOR KNOB : It rotates clockwise and counterclockwise. use it to select the various autofocus
patern available. Refer to camera manual for in depth use.
29. ENTER / PLAYBACK ZOOM BUTTON : Press to acknowledge selected function or use for zooming in playback mode.
30. PROTECT BUTTON : Press to protect selected image from accidendal deletion.
31. THUMBNAIL BUTTON : Press to display images in “contact sheets” of 4 or 9 images.
32. MENU BUTTON : Press to ativate menu, use multi selectors buttons (27) to navigate, press enter button (29) to choose a
selection.
33. PLAYBACK BUTTON : Press to activate the monitor and review images.
34. BRACKETING BUTTON: Push to activate the bracketing function, rotate main command knob to desired exposure correction.
35. DELETE BUTTON : Press to delete images, use multiple selector buttons to select and press enter button to delete. Used in
conjunction with mode selector button (14) to format the card inside the camera
36. REAR VIEW DISPLAY WINDOW : allow viewing of menu and images
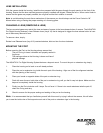
37. SACRIFICIAL ANODES: (3X) zinc anodes are installed to protect your housing against salt water corrosion, theses are
made to deteriorate easier than the other strategic part of your housing, hence the name sacrificial anodes. These anodes
will need to be replaced as needed.
38. MOUNTING HOLES : Two 1/4” X 20 holes are provided for mounting strobes trays or accessories.
39. LATCHES : Two heavy duty latches are provided with safety locks to protect against accidental opening.
Page 4 of 14